Top Ad 728x90

Sunday, July 20, 2025

Elvis Presley Sheet Cake

by


 In the realm of desserts, there are few treats as iconic and beloved as the Elvis Presley Sheet Cake. Named after the legendary King of Rock and Roll himself, this delectable cake combines classic flavors with a tropical twist, resulting in a dessert fit for royalty. In this article, we’ll delve into the origins of the Elvis Presley Sheet Cake, explore its ingredients and preparation methods, and provide tips for making this crowd-pleasing dessert at home.


Ingredients:
Cake Ingredients:
Ingredient Quantity
Yellow cake mix 1 box
Vanilla pudding (3-ounce box, not sugar-free) 1 box
Eggs 4
Oil 1/2 cup
Milk 1 cup
Crushed pineapple (16 ounces, undrained) 1 can
Sugar 1 cup
Frosting Ingredients:
Ingredient Quantity
Cream cheese (softened to room temperature) 1 package (8 ounces)
Butter (softened to room temperature) 1/2 cup
Confectioner’s sugar 3 cups
Chopped pecans (optional) 1/2 cup
Vanilla extract (optional) 1 teaspoon
Instructions:
For the Cake:
Preheat the Oven:
Preheat your oven to 350°F (175°C). Grease a 9×13-inch baking pan or line it with parchment paper.
Mix the Cake Batter:
In a large mixing bowl, combine the yellow cake mix, vanilla pudding mix, eggs, oil, milk, crushed pineapple (with juice), and sugar. Mix until well combined and smooth.

Bake the Cake:
Pour the cake batter into the prepared baking pan, spreading it evenly. Bake in the preheated oven for 30-35 minutes, or until a toothpick inserted into the center comes out clean.
Cool the Cake:
Remove the cake from the oven and let it cool completely in the pan on a wire rack.
For the Frosting:
Prepare the Frosting:
In a separate mixing bowl, beat together the softened cream cheese and butter until smooth and creamy.
Add the Sugar:
Gradually add the confectioner’s sugar to the cream cheese mixture, beating until well combined and fluffy. If desired, stir in the vanilla extract.
Frost the Cake:
Once the cake has cooled completely, spread the frosting evenly over the top. Sprinkle with chopped pecans, if using.
Serve and Enjoy:
Slice the cake into squares and serve. Store any leftovers in the refrigerator.

Mini Meatloaf Muffins

by


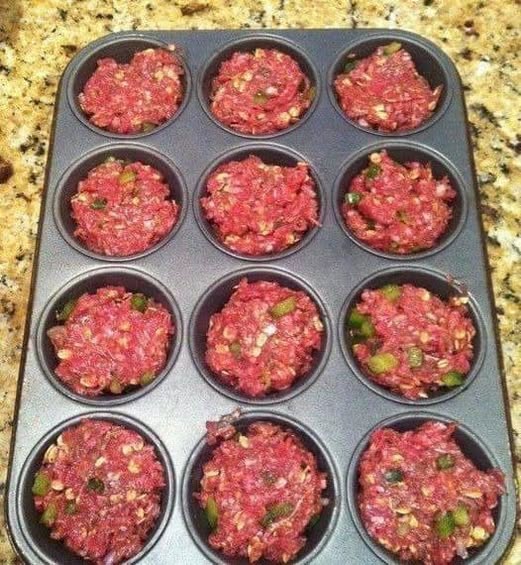
 This recipe will help you make cute mini meatloaf muffins that your family will enjoy. They are full of flavor and are small muffins meant for one person, making them just the right size for everyone.


Mini meatloaf muffins are a delicious way to savor the taste of classic meatloaf in a small and easy-to-eat form, perfect for a fast and simple meal. They can be cooked quickly and are great for a busy dinner during the week.


List of components.

1 and a half pounds of ground beef

Half a cup of chopped onion

Half a cup of chopped bell pepper.

2 teaspoons of Worcestershire sauce

2 tablespoons of fresh parsley, chopped.

1 teaspoon of Dijon mustard

1/4 cup of barbecue sauce

2/3 cup of bread crumbs

1 teaspoon of Italian seasoning

1 teaspoon of powdered garlic

1 Big egg

Add salt and pepper as desired.


For the topping:


1/4 cup of barbecue sauce

1/4 cup of ketchup

1 tablespoon of honey

Instructions for Making Mini Meatloaf Muffins 1. Preheat the oven to 375°F. 2. In a bowl, mix together ground beef, breadcrumbs, egg, ketchup, and seasonings. 3. Divide the mixture into a muffin tin, filling each cup to the top. 4. Bake for 25-30 minutes or until fully cooked. 5. Let them cool for a few minutes before removing

Heat the oven to 350 degrees.

Put all the ingredients for the meatloaf in a bowl and mix them together using your hands until they are well combined.

Divide the mixture equally into 10 greased sections of a muffin tray.


Mix the ingredients for the sauce and put it on top of each small meatloaf.

Bake for 25 minutes until golden brown and fully cooked.

Chicken Salad Croissants

by


 Chicken Salad Croissant Sandwiches are filled with flavorful chicken salad stuffed between buttery, soft croissant rolls. These are delicious sandwiches we love to eat year round!I believe everyone has their own special way to make chicken salad. The varieties are endless and definitely delicious. I like mine pretty simple, and without any nuts, like a lot of recipes have.

Today, I’m sharing my favorite way to make it. My chicken salad is cool, refreshing and so flavorful. It’s the perfect recipe for summer time! One of my favorite ways to enjoy it is between a soft buttery croissant.

Ingredients :
4 cups cooked shredded chicken
1 1/2 cups chopped celery
1 12 cups red grapes – halves
2 green onions, finely chopped
1 cup mayonnaise
1/4 cup sour cream or ranch dressing
2 tablespoons chopped fresh dill
1 teaspoon black pepper
1 teaspoon salt
Juice of a small lemon
8 croissant rolls


Instructions :
Add the cooked chicken, celery, grapes and green onions in a large bowl. Toss to collect. Set the bowl aside.
In a small bowl add mayonnaise, sour cream, chopped dill, pepper, salt and lemon juice. Whisk together until combined. Pour the sauce over the chicken mixture. Stir until combined.
Cover and place in the refrigerator for at least 4 to 6 hours or overnight.
Cut each croissant roll in half. Spread half a cup of chicken salad on the bottom half. Put the other half on top.

This is my signature dish for church suppers

by


 Slow Cooker Church Supper Spaghetti is a hearty and comforting dish that’s easy to make and even easier to clean up. The flavors meld together beautifully as the sauce simmers slowly in the crockpot, resulting in a rich and satisfying meal.

Ingredients:
Ingredient Quantity
Ground Beef 2 pounds
Onion, chopped 1 large
Garlic, minced 4 cloves
Crushed Tomatoes 2 cans (28 ounces each)
Tomato Sauce 1 can (15 ounces)
Tomato Paste 1 can (6 ounces)
Red Wine (optional) 1/2 cup
Sugar 1 tablespoon
Dried Basil 2 teaspoons
Dried Oregano 2 teaspoons
Dried Parsley 1 teaspoon
Crushed Red Pepper Flakes 1/2 teaspoon
Salt To taste
Pepper To taste
Spaghetti 1 pound
Instructions:
Brown the Ground Beef: In a large skillet over medium heat, brown the ground beef until fully cooked. Drain excess fat.
Sauté Onions and Garlic: Add the chopped onion and minced garlic to the skillet and sauté until the onion is translucent.

Combine Ingredients in Slow Cooker: Transfer the beef mixture to a slow cooker. Add the crushed tomatoes, tomato sauce, tomato paste, red wine (if using), sugar, basil, oregano, parsley, crushed red pepper flakes, salt, and pepper. Stir to combine all the ingredients.
Cook on Low: Cover and cook on low for 6-8 hours, or on high for 3-4 hours.
Cook Spaghetti: About 20-30 minutes before serving, cook the spaghetti according to the package instructions until al dente. Drain the spaghetti.
Combine Spaghetti and Sauce: Add the cooked spaghetti to the slow cooker, mixing well to ensure the sauce coats the pasta evenly.
Rest and Serve: Allow the spaghetti to sit in the slow cooker for another 10 minutes to absorb the flavors, then serve hot.
Enjoy your delicious and easy Slow Cooker Church Supper Spaghetti!

Baked Cauliflower That Tastes Better Than Meat

by


Looking for a side dish that’s so crispy, savory, and satisfying you’ll forget you’re eating veggies?

Say hello to this Crispy Roasted Cauliflower Recipe — a game-changing way to enjoy cauliflower that delivers all the flavor of meaty dishes without the guilt.

Perfectly golden. Loaded with seasoning. And yes — better than meat in texture, crunch, and taste.

Whether you're cooking for a carnivore or feeding a plant-based crew, this baked cauliflower will win over every plate at the table.

Let’s dive into how to make it!


❤️ Why You’ll Love This Recipe

  • Meat-like texture : Crispy outside, tender inside
  • Flavor-packed : Coated in bold seasonings and roasted to perfection
  • Plant-based power : Great for veggie lovers and flexitarians
  • No deep frying needed : Healthy oven-baked alternative
  • Crowd-pleasing : Even meat-eaters love this one!

📝 Ingredients Needed (Serves 4)

For the Cauliflower:

  • 1 large head of cauliflower, cut into bite-sized florets
  • 2 tbsp olive oil (or avocado oil)
  • 1 tsp garlic powder
  • 1 tsp smoked paprika
  • ½ tsp salt
  • ¼ tsp black pepper
  • Optional: Parmesan cheese, nutritional yeast, or chili flakes for extra kick

🔪 Step-by-Step Instructions

Step 1: Preheat the Oven

Set your oven to 400°F (200°C) . Line a baking sheet with parchment paper or a silicone mat.

Step 2: Prep the Florets

Cut the cauliflower into even pieces — this helps them roast evenly and crisp up beautifully.

Step 3: Season Generously

Toss the florets with olive oil and all the spices until fully coated. Make sure each piece gets some love!

Step 4: Spread & Bake

Arrange the cauliflower in a single layer on the baking sheet. Don’t overcrowd — give them space to brown.

Roast for 25–30 minutes , flipping halfway through, until deeply golden and crispy around the edges.

Step 5: Serve Hot

Enjoy right out of the oven — dipped in ranch, buffalo sauce, or simply seasoned with a squeeze of lemon.


🧑‍🍳 Chef Tips for Extra Crispiness

  • Use a rimmed baking sheet for best heat distribution.
  • Flip the florets once during baking to crisp both sides.
  • Add a sprinkle of cornstarch or flour to help dry out moisture for extra crunch.
  • For a cheesy twist, toss with grated Parmesan or vegan cheese before roasting.
  • Want more protein? Dredge in batter or breadcrumbs for a “fried cauliflower” effect.

🍽 Serving Suggestions

  • Top with creamy tahini or ranch dressing
  • Serve as a meat-free main with quinoa or rice
  • Pair with buffalo sauce for a spicy appetizer
  • Add to wraps, grain bowls, or salads
  • Sprinkle with fresh herbs or hot honey for gourmet flair

🧊 Storage Tips

  • Store leftovers in an airtight container in the fridge for up to 4 days.
  • Reheat in the oven or air fryer to restore crispiness.
  • Freeze cooled florets for up to 2 months — re-crisp in the oven when ready to eat.

🌱 Dietary Modifications & Substitutions

  • Vegan Option : Skip cheese or use nutritional yeast or vegan Parmesan.
  • Low-Fat Version : Use a light spray of oil or water-brushing technique.
  • Keto-Friendly : Keep the oil and add keto-friendly sauces like garlic butter or buffalo.
  • Gluten-Free : Naturally gluten-free — ensure any added sauces are GF certified.

❓ Frequently Asked Questions

Can I make this in an air fryer?

Yes! Cook at 375°F (190°C) for 12–15 minutes, shaking halfway through.

Why isn’t my cauliflower crispy?

Make sure to spread in a single layer and avoid steaming by overcrowding the pan.

What other seasonings work well?

Try Cajun spice, Italian seasoning, za’atar, or even curry powder for global flavors.


🎉 Final Thoughts

This Crispy Roasted Cauliflower Recipe proves that vegetables can be just as satisfying as meat — especially when baked to golden, crunchy perfection.

With its bold seasonings, irresistible texture, and endless serving options, this recipe is more than just a side dish — it’s a full meal upgrade.

So go ahead — roast those florets, serve with your favorite dip, and let everyone taste the magic of cauliflower done right.

Top Ad 728x90