Top Ad 728x90

Tuesday, May 20, 2025

Fail-Proof Egg Custard

by


 Egg custard is a classic dessert celebrated for its velvety texture and subtly sweet flavor. While it may seem simple—just eggs, milk, sugar, and vanilla—it can easily go wrong if not handled carefully. Overcooking leads to curdling, while undercooking gives a runny texture. This “Fail-Proof Egg Custard” method ensures creamy, smooth results every time.

Here’s how to make a perfect egg custard from scratch—step by step.

🍮 Ingredients:

  • 2 cups (500 ml) whole milk (or half-and-half for richer custard)
  • 3 large eggs
  • ½ cup (100 g) granulated sugar
  • 1 teaspoon pure vanilla extract
  • A pinch of salt
  • Ground nutmeg (optional, for garnish)

🥄 Equipment:

  • Medium saucepan
  • Mixing bowl
  • Whisk
  • Fine mesh strainer (for extra smoothness)
  • 4 to 6 ramekins or a baking dish
  • Roasting pan (for water bath)
  • Oven
  • Step-by-Step Method:

    Step 1: Preheat the Oven
    Preheat your oven to 325°F (160°C). Place a kitchen towel in the bottom of a deep roasting pan and set aside—this helps keep the ramekins stable in the water bath later.

    Step 2: Heat the Milk
    Pour the milk into a medium saucepan and gently heat it over medium-low. Warm until it’s hot but not boiling—about 120–140°F (50–60°C). You’ll see tiny bubbles forming at the edges. Stir occasionally to avoid scorching.

    Step 3: Whisk the Eggs and Sugar
    In a large bowl, whisk together the eggs, sugar, salt, and vanilla until fully blended. You’re not trying to whip air in—just combine until smooth.

    Step 4: Temper the Eggs
    Here’s the critical step to avoid scrambled eggs! Slowly pour a little of the hot milk into the egg mixture while whisking constantly. This gradually warms the eggs without cooking them. Once combined, continue adding the rest of the milk in a steady stream while whisking.

    Step 5: Strain for Smoothness
    Pour the custard mixture through a fine mesh strainer into a clean bowl or large measuring cup. This removes any bits of cooked egg or shell and ensures a silky custard.

    Step 6: Fill the Ramekins
    Divide the custard mixture evenly among 4 to 6 ramekins. Place them in the towel-lined roasting pan. Carefully pour hot water (from a kettle) into the pan around the ramekins, about halfway up their sides. This water bath, or bain-marie, ensures even and gentle cooking.

    Step 7: Bake Gently
    Place the pan in the preheated oven and bake for 30–40 minutes. The custard is done when the edges are set but the centers still jiggle slightly when gently shaken. Don’t overbake—the custard will continue to cook slightly after removal.

    Step 8: Cool and Chill
    Remove ramekins from the water bath and let them cool on a wire rack. Once room temperature, cover and refrigerate for at least 2 hours, or until fully chilled and set.

    Step 9: Garnish and Serve
    Before serving, sprinkle a pinch of ground nutmeg on top for a traditional touch. Serve plain, or with berries, caramel, or a dusting of cinnamon.

    ✨ Tips for Success:

    • Always temper the eggs slowly—this is the number one way to prevent curdling.
    • Use fresh, good-quality eggs and milk for the best flavor.
    • Whole milk creates a nice balance, but for ultra-luxurious custard, use half-and-half or a splash of cream.
    • A thermometer helps: pull them at 170–175°F (77–80°C) internal temp for perfection.

    This fail-proof method brings consistent results whether you’re a beginner or a seasoned home baker. Once mastered, this custard can be a base for endless variations—try infusing the milk with lavender, citrus zest, or spices for a gourmet twist.

    Would you like a printable version or a custard variation (like coconut or caramel)?

Soothe Joint and Foot Pain Naturally

by


 Soothe Joint and Foot Pain Naturally with a Rosemary-Infused Wellness Drink


Imagine easing joint discomfort, boosting your energy levels, and helping manage blood sugar—all with a simple homemade beverage made from common kitchen staples. This natural remedy is gaining attention for its impressive combination of health benefits.


What Makes This Drink So Special?


Each ingredient in this recipe offers individual health advantages, but together they create a potent synergy that supports the body in multiple ways. Here's a closer look at the key components and what they do.


The Powerful Benefits of These 5 Natural Ingredients


1. Honey


A rich source of antioxidants, honey helps calm inflammation, supports digestion, and offers a gentle energy lift without causing a rapid blood sugar spike.


2. Cinnamon


This aromatic spice helps regulate blood sugar, promotes heart health, and contains numerous anti-inflammatory compounds.


3. Turmeric


Thanks to curcumin, its active compound, turmeric is celebrated for relieving joint pain, supporting brain health, and protecting cells from oxidative stress.


4. Apple Cider Vinegar

This fermented liquid promotes better digestion, helps stabilize blood sugar levels, strengthens immunity, and enhances calcium absorption due to its probiotic content.


5. Chia Seeds


Packed with omega-3 fatty acids, calcium, and fiber, chia seeds support bone health, improve heart function, and help maintain steady blood sugar.


How to Make This Simple Health Drink


Ingredients:

How to Make This Simple Health Drink

Ingredients:


1 tablespoon raw honey


½ teaspoon ground cinnamon


½ teaspoon turmeric powder


1 tablespoon apple cider vinegar


1 tablespoon chia seeds


200 ml of warm water or a warm plant-based milk (like almond or oat)


Step-by-Step Preparation:


1. Soak the Chia Seeds


Place the chia seeds in about 100 ml of warm water. Let them sit for 10–15 minutes until they form a gel-like texture.


2. Blend the Spices


In a separate cup, combine the cinnamon and turmeric.


3. Add the Liquids


Pour in the apple cider vinegar, followed by the honey. Stir well until the honey dissolves completely.


4. Mix in the Chia Gel


Add the soaked chia seeds to the spice mixture and stir thoroughly until well blended.


5. Enjoy!

Strawberry Citrus Iced Tea

by


 Introduction:

This Strawberry Citrus Iced Tea is a refreshing beverage ideal for summer gatherings, daily hydration, or entertaining guests. Combining the tartness of lemon, the sweetness of strawberries, and the cooling presence of mint, this tea delivers a balanced and revitalizing flavor. It is stored in mason jars for convenience, making it both visually appealing and practical.


Ingredients:

  • 6 cups brewed black or green tea (cooled to room temperature)

  • 1 cup fresh strawberries, hulled and sliced

  • 1 lemon, thinly sliced

  • 1 orange, thinly sliced

  • 2–3 tablespoons honey or sugar (optional, adjust to taste)

  • Fresh mint leaves (optional)

  • Ice cubes

  • 3 mason jars (quart-sized) for storage


Instructions:

  1. Brew the tea:
    Prepare 6 cups of your preferred tea (black or green), and let it cool to room temperature. For stronger flavor, steep longer than usual, then strain.

  2. Prepare the fruit:
    Rinse and slice the strawberries, lemon, and orange into thin rounds or halves.

  3. Fill the jars:
    Evenly distribute the fruit slices and a few mint leaves among the mason jars.

  4. Sweeten (optional):
    If using sweetener, stir honey or sugar into the cooled tea until fully dissolved.

  5. Assemble the tea:
    Pour the sweetened or unsweetened tea over the fruit in each jar, filling nearly to the top.

  6. Seal and chill:
    Secure the lids on the jars and refrigerate for at least 2–4 hours to allow the flavors to infuse.

  7. Serve:
    Shake gently before serving. Pour over ice if desired, or drink directly from the jar using a straw.


Conclusion:
Strawberry Citrus Iced Tea is a practical, healthy, and flavorful option for staying hydrated. It is easy to prepare in advance and keeps well in the refrigerator for several days. Ideal for both casual use and formal gatherings, it offers a visually appealing and naturally flavored alternative to commercial beverages.

Iowa Party Bites

by


INTRODUCTION

Iowa Party Bites are the perfect bite-sized treat for game day, holiday gatherings, or family movie nights. Made with crispy Tostitos Scoops tortilla chips, creamy cheese, and gooey mozzarella, these mini morsels are irresistibly cheesy and satisfying. They’re quick to prep, easy to bake, and always disappear fast. Whether you’re hosting a crowd or looking for a fun snack, these party bites deliver big flavor in a tiny, crunchy package.


YOU WILL NEED

  • 1 (10 oz) bag Tostitos Scoops tortilla chips

  • 1 (8 oz) block cream cheese, softened

  • 8 oz shredded mozzarella cheese

  • Optional: chopped parsley or green onions for garnish

  • Optional add-ins: crumbled bacon, diced jalapeños, or taco-seasoned ground beef


INSTRUCTIONS

Step 1: Preheat the Oven
Preheat your oven to 375°F (190°C). Line a baking tray with parchment paper or foil for easy cleanup.

Step 2: Prepare the Filling
In a mixing bowl, beat the softened cream cheese until smooth.
Fold in the shredded mozzarella until fully combined. You can also mix in cooked bacon bits or finely chopped jalapeños for added flavor.

Step 3: Assemble the Bites
Lay the Tostitos Scoops on the prepared baking tray.
Spoon a small amount of the cheese mixture into each chip — don’t overfill or they might overflow in the oven.

Step 4: Bake
Bake for 8–10 minutes, or until the cheese is melted and bubbling.
Remove from oven and let cool slightly.

Step 5: Garnish and Serve

Sprinkle with chopped parsley, green onions, or more bacon if desired.
Serve warm and watch them disappear!


CLOSING

Iowa Party Bites are the ultimate cheesy, crunchy, creamy crowd-pleaser. With just a few simple ingredients and minutes in the oven, you’ll have a tray full of deliciousness ready to wow your guests. Perfect for any occasion — or no occasion at all — these little bites are bound to become your new go-to snack. 🧀🎉

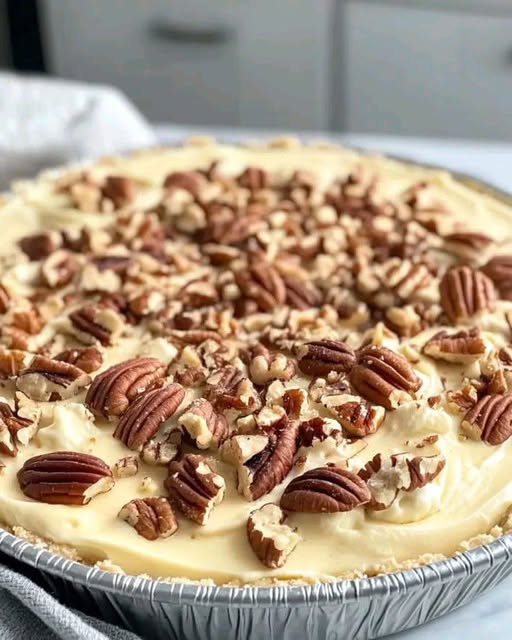
No-Bake Creamy Pecan Pie

by


 Introduction:

This No-Bake Creamy Pecan Pie is the ultimate dessert for anyone craving rich, velvety sweetness with a nutty crunch — all without turning on the oven. With a smooth, creamy vanilla pudding filling, a buttery crust, and generous layers of toasted pecans, this chilled pie is an easy showstopper that’s perfect for holidays, potlucks, or simply treating yourself. It comes together in minutes and tastes like something you’d find in a Southern grandma’s kitchen!


Ingredients:

  • 1 (9-inch) graham cracker or shortbread pie crust (store-bought or homemade)

  • 1 (8 oz) package cream cheese, softened

  • 1 cup powdered sugar

  • 1 (8 oz) container whipped topping (like Cool Whip), thawed

  • 1 (3.4 oz) box instant vanilla pudding mix

  • 1 cup cold milk

  • 1 teaspoon vanilla extract

  • 1½ cups chopped pecans (lightly toasted for best flavor)


Instructions:

  1. Make the cream cheese layer:
    In a medium bowl, beat the softened cream cheese and powdered sugar until smooth and creamy. Gently fold in half of the whipped topping until well combined. Spread this mixture evenly into the bottom of the pie crust.

  2. Prepare the pudding filling:
    In another bowl, whisk together the instant vanilla pudding mix, cold milk, and vanilla extract for 2 minutes until it thickens. Fold in the remaining whipped topping until smooth and fluffy.

  3. Layer the pudding mixture:
    Spread the pudding mixture over the cream cheese layer, smoothing the top with a spatula.

  4. Top with pecans:
    Sprinkle chopped pecans generously over the top. You can also press in a few whole pecan halves for a beautiful presentation.

  5. Chill to set:
    Cover and refrigerate the pie for at least 4 hours, or until fully set. For best results, let it chill overnight.

  6. Serve cold:
    Slice and enjoy straight from the fridge for a perfectly chilled and creamy treat!


Conclusion:
This No-Bake Creamy Pecan Pie is pure dessert bliss — smooth, nutty, and melt-in-your-mouth delicious. It’s the kind of pie that gets recipe requests at every gathering and leaves everyone going back for seconds. Whether you’re celebrating a holiday or just indulging in something sweet, this pie hits all the right notes without ever touching the oven. 🥄🍂


Golden Vanilla Bundt Cake

by


 This Golden Vanilla Bundt Cake is a timeless classic that fills your kitchen with the comforting aroma of vanilla and butter. It’s rich, moist, and beautifully golden on the outside, with a soft, fluffy interior that melts in your mouth. Whether you’re making it for a weekend dessert, a family gathering, or simply to enjoy with your morning coffee, this cake never fails to impress. The simple ingredients come together effortlessly to create something truly special—a cake that’s as beautiful as it is delicious.


Ingredients:

  • 2½ cups all-purpose flour

  • 1 tablespoon baking powder

  • ½ teaspoon salt

  • 1 cup unsalted butter (softened)

  • 1½ cups granulated sugar

  • 4 large eggs

  • 1 tablespoon vanilla extract

  • 1 cup whole milk (room temperature)

  • Optional: ¼ cup plain yogurt or sour cream for extra moisture

  • Butter and flour for greasing the pan


Instructions:

  1. Preheat & Prepare:

    • Preheat your oven to 350°F (175°C).

    • Grease a Bundt cake pan thoroughly with butter, then dust lightly with flour to prevent sticking.

  2. Mix the Dry Ingredients:

    • In a medium bowl, whisk together the flour, baking powder, and salt. Set aside.

  3. Cream the Butter & Sugar:

    • In a large bowl, beat the softened butter with sugar until light and fluffy—about 3–4 minutes.

    • Add the eggs one at a time, beating well after each addition.

  4. Add the Vanilla & Milk:

    • Mix in the vanilla extract.

    • Alternately add the flour mixture and milk to the butter mixture in 2–3 parts, beginning and ending with the dry ingredients.

    • If using, stir in the yogurt or sour cream at the end for added moisture.

  5. Bake the Cake:

    • Pour the batter into the prepared Bundt pan and smooth the top with a spatula.

    • Bake for 45–55 minutes, or until a toothpick inserted into the center comes out clean.

    • The top should be golden brown and slightly springy.

  6. Cool & Serve:

    • Let the cake rest in the pan for 10–15 minutes.

    • Carefully invert onto a wire rack and allow to cool completely before slicing.

    • Optional: Brush the warm cake with melted butter or a simple sugar glaze for extra shine.


Conclusion:

This Golden Vanilla Bundt Cake is the perfect celebration of simplicity. With a texture that’s both tender and rich, and a golden crust that gives a satisfying crunch with each bite, it’s the kind of cake you’ll come back to again and again. Serve it plain, with whipped cream, or a drizzle of glaze—and enjoy the kind of homemade comfort that only a true classic can bring.

OLD-FASHIONED CHERRY COBBLER

by


 Introduction:

There’s something timeless and comforting about a warm, bubbling cobbler coming out of the oven — especially when it’s made with juicy, ruby-red cherries. This Old-Fashioned Cherry Cobbler is a nostalgic dessert that brings back the flavors of homemade summer pies and family gatherings. With just a few simple ingredients, you can create a dessert that tastes like it’s been passed down for generations. Serve it warm with vanilla ice cream for the ultimate indulgence!


You Will Need:

  • 4 cups fresh or frozen pitted cherries

  • ½ cup granulated sugar

  • 1 tablespoon lemon juice

  • For the Biscuit Topping:

  • 1 cup all-purpose flour

  • ¼ cup granulated sugar

  • 1½ teaspoons baking powder

  • ¼ teaspoon salt

  • ½ cup (1 stick) unsalted butter, cold and cubed

  • ⅓ cup milk (plus 1 tablespoon if needed)

  • Optional: coarse sugar for topping


Instructions:

  1. Preheat your oven to 375°F (190°C). Grease an 8×8-inch baking dish or similar-sized oven-safe dish.

  2. Prepare the filling:

  3. In a large bowl, mix the cherries, sugar, and lemon juice until evenly coated. Pour the mixture into the prepared baking dish.

  4. Make the biscuit topping:
    In a medium bowl, whisk together the flour, sugar, baking powder, and salt. Add the cold butter cubes and cut them in using a pastry cutter or fork until the mixture resembles coarse crumbs.

  5. Add milk to form a dough:
    Pour in the milk and stir just until combined. Do not overmix — the dough should be thick but scoopable. Add a splash more milk if needed.

  6. Scoop the topping:
    Drop spoonfuls of the dough evenly over the cherry mixture, leaving some gaps so the fruit can bubble through.

  7. Optional:
    Sprinkle coarse sugar on top of the dough for a golden, crunchy finish.

  8. Bake for 35–40 minutes or until the top is golden brown and the cherry filling is bubbly around the edges.

  9. Cool slightly before serving.
    Let the cobbler rest for 10 minutes to thicken before scooping.


Conclusion:
This Old-Fashioned Cherry Cobbler is the kind of dessert that wraps you in a warm hug. It’s simple, satisfying, and bursting with cherry flavor. Whether served on a cozy night in or shared at a festive gathering, it never fails to impress. Don’t forget the scoop of vanilla ice cream on top — it’s the cherry on the cobbler! 🍒🍨

Top Ad 728x90