Top Ad 728x90

Sunday, May 11, 2025

Fluffy Apple Pancakes

by


 These easy and delicious apple pancakes are perfect for breakfast, a snack, or even a light dessert. They’re naturally sweet, moist, and full of cozy apple flavor!

Want more quick and healthy pancake ideas? Visit Tinsuf.com — where comfort meets simplicity in every recipe.

 Ingredients

  • apple, grated

  • 150g plain yogurt

  • egg

  • 100g flour (wheat or oat)

  • 1 tsp baking powder

  • Optional: pinch of cinnamon or a few drops of vanilla extract for extra flavor

 Directions

1. Prepare the Batter

  • Grate the apple and place it in a large bowl

  • Add the yogurt and egg, mixing well until smooth

  • Sift the flour and baking powder into the wet mixture

  • Stir gently until the batter is thick and well combined

2. Cook the Pancakes

  • Heat a non-stick skillet over medium heat

  • Lightly grease with butter or oil if desired

  • Scoop portions of batter with a spoon to form small pancakes

  • Cook each side for 2–3 minutes until golden and cooked through

3. Serve

  • Serve warm with:

    • Honeyfresh fruitsextra yogurt, or a sprinkle of cinnamon

 Time & Serving

  • Prep time: 10 minutes

  • Cook time: 10 minutes

  • Total time: 20 minutes

  • Makes: ~6–8 pancakes

 Tips & Variations

  • Use Greek yogurt for a richer texture

  • Add chopped nuts or raisins to the batter for extra texture

  • For a vegan version, replace the egg with a flaxseed egg

 Discover More

Want more wholesome, easy-to-make breakfasts?
Explore Tinsuf.com — where healthy meets delicious every morning.

5-Minute Healthy Oat Pancakes

by


5-Minute Healthy Oat Pancakes

Fluffy, sugar-free, and flourless—packed with fiber and protein! Perfect for a quick, guilt-free breakfast.


Ingredients (Makes ~8 pancakes)

  • 2 cups oatmeal (220g rolled oats)

  • ½ tsp salt (3g)

  • eggs

  • 1 cup warm milk (250ml, any type)

  • 3½ tbsp butter, melted (50g)

  • 1 tbsp vanilla extract (or 1 tsp vanillin)

  • 1 cup water (250ml, adjust for batter consistency)

  • Optional add-ins:

    • 1 tsp cinnamon

    • ½ mashed banana (for natural sweetness)

    • ¼ cup blueberries or chopped nuts


Instructions

1. Blend the Batter (1 min):

  • In a blender, combine oats, salt, eggs, milk, melted butter, vanilla, and water. Blend until smooth (30 secs).

  • Let rest 2 mins to thicken (oats absorb liquid).

2. Cook (2 mins):

  • Heat a non-stick pan over medium-low. Pour ¼ cup batter per pancake.

  • Cook 1-2 mins per side until golden (no flipping too early!).

3. Serve Hot:

  • Top with fresh fruit, yogurt, nut butter, or sugar-free syrup.


Why You’ll Love These

✅ No sugar or flour—naturally sweetened with vanilla!
✅ High in fiber & protein—keeps you full for hours.
✅ Gluten-free (use certified GF oats if needed).

Pro Tip: For fluffier pancakes, add 1 tsp baking powder to the batter.


Variations

🍫 Chocolate Chip: Add 2 tbsp sugar-free chocolate chips.
🍌 Banana-Oat: Blend in ½ ripe banana.
🌱 Vegan: Swap eggs for 2 flax eggs (2 tbsp flaxmeal + 6 tbsp water).

Breakfast ready before your coffee brews! ☕⏱️


Nutrition per pancake (approx):

  • Calories: ~120

  • Protein: 5g | Fiber: 2g | Sugar: 1g (natural from oats)

Freezer-friendly: Stack cooled pancakes with parchment paper, freeze up to 1 month. Reheat in toaster!

No Oven Stovetop Bread Recipe

by


 This recipe provides instructions for making a unique and convenient No-Oven Stovetop Bread, a fantastic alternative for those who don’t have access to an oven or simply prefer a quicker baking method. This bread is cooked entirely on the stovetop in a covered skillet, resulting in a soft and slightly chewy texture with a golden-brown crust on the bottom and sides. The recipe typically uses a simple dough made from all-purpose flour, baking powder (as the leavening agent instead of yeast), salt, sugar (optional, for a touch of sweetness), and a liquid such as milk, water, or yogurt. The dough is quickly mixed, sometimes briefly kneaded, and then shaped into a round or individual portions before being cooked in a skillet over low to medium heat. The covered skillet creates a steamy environment that helps the bread cook through without drying out. This stovetop bread is surprisingly versatile; it can be enjoyed plain, with butter, jam, or as an accompaniment to soups and stews. Its ease of preparation and the fact that it doesn’t require yeast or oven baking make it a practical and appealing option for many situations. The image shows a round loaf of golden-brown bread in a dark skillet. The bread appears to be made of several connected segments and has a slightly shiny surface, possibly from butter. A pat of butter is melting in the center of the loaf.  

The absence of an oven necessitates a different leavening agent than yeast. This recipe relies on baking powder, a chemical leavening agent that produces carbon dioxide gas when activated by liquid and heat, causing the bread to rise during cooking.  

All-purpose flour forms the structural base of the bread. Salt is essential for flavor and to control the leavening action of the baking powder. Sugar is often added in small amounts for a touch of sweetness and to aid in browning.

The liquid component, such as milk, water, or yogurt, hydrates the dry ingredients and helps to create a cohesive dough. Yogurt, in particular, can add a slight tang and contribute to a softer texture.

Fat, usually in the form of butter or oil, is often incorporated into the dough for richness and tenderness. It also helps in achieving a softer crumb. Additionally, butter or oil is used to grease the skillet and sometimes brushed on the bread for flavor and a golden-brown crust.  

The cooking method is the defining feature of this bread. A heavy-bottomed skillet, preferably cast iron for even heat distribution, is used. The dough is placed in the greased skillet, and the skillet is covered tightly. The bread is cooked over low to medium heat, allowing it to cook through gently without burning the bottom. The trapped steam inside the covered skillet helps the bread to cook evenly and remain soft. The bread is typically flipped halfway through the cooking process to ensure both sides are golden brown and cooked.

No-Oven Stovetop Bread is best enjoyed warm. Its texture can range from soft and slightly chewy to somewhat dense, depending on the specific recipe and cooking time. It can be customized with herbs, spices, or cheese added to the dough for different flavor variations. This method offers a unique way to enjoy freshly baked bread without the need for a traditional oven.

The texture of No-Oven Stovetop Bread is typically soft and slightly chewy, with a golden-brown and slightly crisp exterior (especially on the bottom and sides that come into direct contact with the skillet). The crumb is usually dense yet tender.

The flavor profile is generally mild and slightly savory, with a hint of sweetness if sugar is added. The taste can be enriched by the butter or oil used in the dough and for cooking. Any added herbs, spices, or dairy (like yogurt) will contribute their specific flavors.

No-Oven Stovetop Bread is bread made and cooked entirely on a stovetop in a covered skillet, using baking powder as a leavening agent instead of yeast. It results in a soft, slightly chewy bread with a golden-brown crust.

The preparation involves mixing flour, baking powder, salt, sugar (optional), and a liquid (milk, water, or yogurt) with melted butter or oil to form a dough, briefly kneading it, shaping it into a round or portions, placing it in a greased and covered skillet, and cooking over low to medium heat, flipping halfway through until golden brown and cooked through.

Ingredients (Based on Image and Common Stovetop Bread Recipes):

  • 1 cup all-purpose flour
  • 1 teaspoon baking powder
  • ¼ teaspoon salt
  • 1 tablespoon granulated sugar (optional)
  • ½ cup milk, water, or plain yogurt
  • 2 tablespoons unsalted butter or vegetable oil, melted, plus more for greasing the skillet and brushing

Optional Additions:

  • ½ teaspoon dried herbs (such as rosemary, thyme, or oregano)
  • ¼ cup grated cheese (such as cheddar or Parmesan)

Equipment:

  • Mixing bowl
  • Fork or spoon
  • Lightly floured surface
  • Rolling pin (optional, for shaping)
  • 6-8 inch heavy-bottomed skillet with a tight-fitting lid (cast iron is ideal)
  • Spatula

Instructions:

  1. Combine Dry Ingredients: In a mixing bowl, whisk together the all-purpose flour, baking powder, salt, and sugar (if using). Stir in any dried herbs or grated cheese if desired.
  2. Add Wet Ingredients: Gradually add the milk, water, or yogurt and the melted butter or oil to the dry ingredients. Stir with a fork or spoon until a shaggy dough forms.
  3. Knead the Dough: Turn the dough out onto a lightly floured surface and knead gently for 2-3 minutes until it comes together into a smooth ball. Avoid over-kneading, as this can make the bread tough.
  4. Shape the Dough: Lightly grease the skillet with butter or oil. You can either keep the dough as a single round loaf or divide it into smaller portions (like 4-6 small buns or segments, as shown in the image). If making a single loaf, you can flatten it slightly with your hands or a rolling pin to fit the skillet. Arrange the smaller portions in the skillet, leaving a little space between them.
  5. Cook the Bread: Place the shaped dough in the greased skillet. Cover the skillet tightly with the lid. Cook over low to medium heat for about 15-25 minutes, or until the bottom of the bread is golden brown and the top looks mostly set. The cooking time will vary depending on the heat of your stovetop and the thickness of the bread.
  6. Flip and Cook the Other Side: Carefully flip the bread (or individual portions) using a spatula. Cover the skillet again and continue to cook for another 10-20 minutes, or until the second side is golden brown and the bread is cooked through. The bread should feel firm to the touch and sound slightly hollow when tapped.
  7. Brush with Butter (Optional): Once the bread is cooked, remove it from the skillet and place it on a plate or wire rack. Brush the top with melted butter for added flavor and a nice sheen.
  8. Cool Slightly and Serve: Let the bread cool slightly before serving. It is best enjoyed warm.

Tips and Variations:

  • Skillet Type: A heavy-bottomed skillet, especially cast iron, is recommended for even heat distribution and to prevent burning.  
  • Heat Control: Keep the heat low to medium to ensure the bread cooks through without burning the bottom. Adjust as needed based on your stovetop.
  • Tight-Fitting Lid: A tight-fitting lid is crucial for trapping steam and helping the bread cook evenly.
  • Liquid Variations: You can experiment with different liquids like buttermilk for a tangier flavor or flavored milk for a subtle sweetness.
  • Flavor Additions: Incorporate herbs, spices, cheese, or even chopped vegetables into the dough for different flavor profiles.
  • Sweet Bread: Increase the amount of sugar and add a pinch of cinnamon or nutmeg for a sweet stovetop bread. You can also add dried fruits like raisins or chopped nuts.
  • Garlic Bread: Brush the cooked bread with garlic butter (melted butter with minced garlic) for a savory twist.
  • Serving Suggestions: Serve this stovetop bread plain, with butter, jam, honey, or as an accompaniment to soups, stews, salads, or dips. It can also be used to make sandwiches.

Enjoy this simple and convenient No-Oven Stovetop Bread! It’s a great way to have fresh bread even without an oven.

Perfectly Crispy Potato Fritters Recipe

by


Introduction

Potato fritters are a universal comfort food loved for their crispy, golden exterior and soft, fluffy interior.

These fritters can be enjoyed as an appetizer, snack, or side dish, pairing well with dips or sauces.

With minimal ingredients and straightforward steps, this recipe ensures you get a delightful, crunchy treat in no time.

Whether you’re using grated potatoes or mashed leftovers, these fritters are bound to be a crowd-pleaser.

Ingredients

Potatoes: 2-3 medium-sized (Russet or Yukon Gold recommended)

ADVERTISEMENT

Egg: 1 large

All-purpose flour: 3 tablespoons

Onion: 1 medium, finely chopped or grated

Garlic: 1 clove, minced

Salt: ½ teaspoon (or to taste)

ADVERTISEMENT

Pepper: ½ teaspoon

Vegetable oil: For frying

Optional:

Chopped scallions or chives for extra flavor.

Cheese (e.g., cheddar or Parmesan) for a cheesy twist.

ADVERTISEMENT

Paprika or chili flakes for added spice.

Instructions

Prepare the Potatoes:

Peel and grate the potatoes. Use a clean kitchen towel to squeeze out excess moisture, ensuring crispier fritters. Alternatively, you can use mashed potatoes for a softer texture.

Mix the Ingredients:

In a large mixing bowl, combine grated potatoes, egg, flour, onion, garlic, salt, and pepper. If adding cheese or spices, mix them in now.

ADVERTISEMENT

Stir until the mixture is evenly combined. The batter should hold together when pressed. If it’s too loose, add a bit more flour.

Shape the Fritters:

Scoop out small portions of the mixture and form them into patties about ½ inch thick.

Fry the Fritters:

Heat vegetable oil in a skillet over medium heat. Test the oil by dropping a small piece of batter; it should sizzle immediately.

Place the fritters in the skillet, ensuring they don’t overlap. Fry for 3-4 minutes per side or until golden brown and crispy.

Remove and place on a plate lined with paper towels to drain excess oil.

Serve and Enjoy:

Serve hot with your favorite dips like sour cream, ketchup, or a tangy yogurt sauce. Garnish with chopped scallions or fresh herbs.

ADVERTISEMENT

Conclusion

These potato fritters are incredibly versatile, making them perfect for any meal or occasion.

Whether you’re hosting a party or simply craving a crispy snack, this recipe guarantees satisfaction.

Customize them with herbs, spices, or cheese to suit your taste. Simple yet indulgent, potato fritters are a timeless dish everyone will love!

Glazed Apple Fritter Donuts Recipe

by


Introduction

Looking for a sweet, crispy, and fruity treat?

These Glazed Apple Fritter Donuts combine juicy apple chunks, a tender dough, and a sweet glaze that melts in your mouth. Perfect for breakfast, dessert, or a snack, these homemade apple fritters are easy to make and absolutely irresistible!


Ingredients

  • 2 cups all-purpose flour

  • ¼ cup granulated sugar

  • 2 teaspoons baking powder

  • ½ teaspoon salt

  • 2 teaspoons ground cinnamon

  • 2 large eggs

  • ⅔ cup whole milk

  • 2 tablespoons unsalted butter, melted

  • 2 teaspoons vanilla extract

  • 2 cups peeled and diced apples (preferably Granny Smith or Honeycrisp)

  • Vegetable oil for frying

For the glaze:

  • 1½ cups powdered sugar

  • 2–3 tablespoons milk

  • 1 teaspoon vanilla extract


Instructions

  1. Prepare the batter
    In a large bowl, whisk together the flour, sugar, baking powder, salt, and cinnamon. In a separate bowl, beat the eggs, milk, melted butter, and vanilla extract. Gradually combine the wet and dry ingredients until a thick batter forms. Gently fold in the diced apples.

  2. Heat the oil
    In a deep skillet or fryer, heat about 2 inches of vegetable oil to 350°F (175°C).

  3. Fry the fritters
    Carefully drop spoonfuls of the batter into the hot oil, flattening slightly with the back of a spoon. Fry for about 2–3 minutes on each side, or until golden brown and cooked through.

  4. Drain and glaze
    Remove the fritters from the oil and place them on a paper towel-lined tray to drain. While still warm, dip each fritter into the glaze, letting the excess drip off.

  5. Serve
    Allow the glaze to set slightly before serving. Enjoy fresh for the best flavor!


Tips for Perfect Apple Fritter Donuts

  • Dice the apples small for even distribution and quicker cooking.

  • Use a candy thermometer to maintain consistent oil temperature.

  • For a thicker glaze, use less milk; for a lighter glaze, add a bit more.


Why You’ll Love This Recipe

These Glazed Apple Fritter Donuts are packed with tender apple pieces, warm cinnamon flavor, and a rich, sweet glaze. They’re a bakery-style treat you can easily create at home and share with family and friends!


Conclusion

If you love homemade treats with a fruity twist, you must try this Glazed Apple Fritter Donuts Recipe. With a crispy exterior, soft interior, and luscious glaze, these donuts are the perfect comfort food to brighten your day!

Lemon Buttermilk Pound Cake

by

    Moist, zesty, and glazed to perfection—this cake is bursting with citrus sunshine!

     Ingredients:

    For the Cake:

    • 1 cup unsalted butter, softened

    • 2 ½ cups granulated sugar

    • 4 large eggs, room temperature

    • 3 cups all-purpose flour

    • ½ tsp baking soda

    • ½ tsp salt

    • 1 cup buttermilk

    • ¼ cup fresh lemon juice

    • 1 tbsp lemon zest

    • 1 tsp vanilla extract

    For the Lemon Glaze:

    • 1 cup powdered sugar

    • 2–3 tbsp fresh lemon juice

    • Optional: thin lemon slices for decoration

     Directions:

    1. Preheat Oven:

    Preheat your oven to 325°F (165°C). Grease and flour a bundt or tube pan.

    2. Cream Butter & Sugar:

    In a large bowl, cream together butter and sugar until light and fluffy.

    3. Add Eggs:

    Beat in eggs one at a time, mixing well after each addition.

    4. Dry Ingredients:

    In a separate bowl, whisk together flour, baking soda, and salt.

    5. Mix Wet Ingredients:

    Combine buttermilk, lemon juice, lemon zest, and vanilla in a small bowl.

    6. Combine Mixtures:

    Alternate adding the dry and wet ingredients into the butter mixture, starting and ending with the dry. Mix just until combined.

    7. Bake:

    Pour batter into the prepared pan. Bake for 60–70 minutes, or until a toothpick inserted in the center comes out clean.

    8. Cool & Glaze:

    Cool in the pan for 15 minutes, then invert onto a wire rack. Once completely cooled, whisk glaze ingredients and drizzle over the cake. Top with lemon slices if desired.

     Tips:

    • Use fresh lemons for the brightest flavor.

    • Let the glaze sit for a few minutes before slicing for cleaner cuts.

    • Store in an airtight container for up to 5 days.


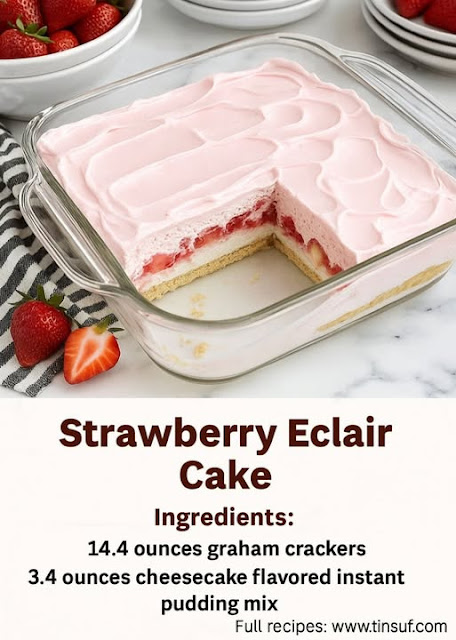
Strawberry Eclair Cake Recipe

by


 This recipe provides instructions for making a delightful Strawberry Eclair Cake, a no-bake dessert that captures the essence of classic chocolate eclairs but with a refreshing strawberry twist. This cake features layers of graham crackers, a creamy vanilla (often achieved with cheesecake-flavored instant pudding mix) filling studded with fresh strawberries, and a luscious strawberry-flavored whipped topping. The graham crackers soften as they absorb moisture from the creamy layers, creating a cake-like texture without any baking required. This dessert is easy to assemble, making it perfect for potlucks, summer gatherings, or any time you crave a light, sweet, and fruity treat that resembles a giant, deconstructed strawberry eclair. The combination of the crunchy graham cracker base, the smooth and tangy pudding filling, the burst of fresh strawberries, and the light whipped topping creates a harmonious blend of textures and flavors that is both satisfying and refreshing.  

The base of the Strawberry Eclair Cake is typically made of graham crackers. These rectangular crackers are layered at the bottom of a baking dish to form the first “cake” layer. As the dessert sits, the graham crackers absorb moisture from the creamy filling, softening and taking on a texture similar to a traditional cake base.

The creamy filling is often made with instant pudding mix, frequently cheesecake-flavored to provide a slightly tangy and rich base. This pudding is usually mixed with cold milk and sometimes cream cheese or whipped topping to enhance its creaminess and stability. Fresh strawberries are a key component of this layer, adding a burst of sweet and slightly tart flavor, as well as a pleasant texture. The strawberries are typically sliced or diced and folded into the pudding mixture.

The top layer of the Strawberry Eclair Cake is a light and airy whipped topping, often flavored with strawberries. This can be achieved by folding strawberry puree or crushed fresh strawberries into whipped cream or using a store-bought whipped topping that has a strawberry flavor. This layer provides a smooth and sweet finish to the cake and complements the creamy filling and fresh strawberries below.

The assembly of the cake involves layering these components in a baking dish. A layer of graham crackers is placed at the bottom, followed by a layer of the creamy strawberry-studded pudding mixture, and finally topped with the strawberry whipped topping. Multiple layers can be created for a taller and more impressive dessert.  

The cake requires chilling in the refrigerator for several hours, ideally overnight, to allow the graham crackers to soften completely and the flavors to meld together. Before serving, the cake can be garnished with additional fresh strawberries, a sprinkle of graham cracker crumbs, or a drizzle of strawberry sauce for an extra touch of elegance and flavor.  

Strawberry Eclair Cake offers a delightful twist on a classic dessert, providing a no-bake alternative that is both easy to make and incredibly delicious. The combination of the creamy, strawberry-infused filling, the softened graham cracker layers, and the light whipped topping creates a refreshing and satisfying treat that is perfect for any occasion. The image shows a rectangular glass baking dish containing a layered dessert. The bottom layer appears to be graham crackers, followed by a creamy white layer with visible slices of red strawberries, and topped with a light pink, swirled whipped topping. A slice has been removed, revealing the layers. Fresh strawberries and a striped kitchen towel are visible next to the dish.  

The texture of Strawberry Eclair Cake is a delightful combination of soft, cake-like graham cracker layers, a smooth and creamy pudding filling with juicy pieces of fresh strawberries, and a light and airy whipped topping.

The flavor profile is sweet and creamy with a prominent strawberry taste from the fresh fruit and the flavored whipped topping. The cheesecake-flavored pudding adds a subtle tanginess that complements the sweetness, while the graham crackers provide a mild, buttery base.

Strawberry Eclair Cake is a no-bake dessert featuring layers of graham crackers, a creamy filling with fresh strawberries (often made with cheesecake-flavored instant pudding), and a strawberry-flavored whipped topping, chilled until the graham crackers soften and the flavors meld.  

The preparation involves layering graham crackers, a mixture of instant pudding, milk, and fresh strawberries, and a strawberry whipped topping in a dish, then chilling until set.  

Ingredients:

  • 14.4 ounces graham crackers (approximately 1 package and a few extra)  
  • 3.4 ounces cheesecake flavored instant pudding mix (or vanilla flavored)  
  • 3 cups cold milk
  • 8 ounces cream cheese, softened (optional, for extra creaminess)
  • 1 teaspoon vanilla extract (if using vanilla pudding mix)
  • 1 pound fresh strawberries, sliced
  • 16 ounces frozen whipped topping, thawed (or homemade whipped cream)
  • 1/2 cup strawberry puree (from about 1 cup fresh strawberries, blended and strained)
  • Optional garnish: extra fresh strawberries, graham cracker crumbs, strawberry sauce

Equipment:

  • 9×13 inch baking dish
  • Mixing bowls
  • Whisk or electric mixer
  • Rubber spatula
  • Blender or food processor (for strawberry puree, optional)

Instructions:

  1. Prepare the Graham Cracker Layers: Line the bottom of a 9×13 inch baking dish with a single layer of graham crackers. You may need to break some of the crackers to fit snugly in the dish.
  2. Make the Pudding Filling: In a large mixing bowl, whisk together the instant pudding mix and cold milk for 2 minutes until the pudding starts to thicken.
  3. Add Cream Cheese (Optional): If using cream cheese, beat the softened cream cheese in a separate bowl until smooth. Gradually add the thickened pudding to the cream cheese and mix until well combined and creamy.
  4. Add Vanilla (if using vanilla pudding): If you are using vanilla flavored instant pudding mix, stir in 1 teaspoon of vanilla extract into the pudding mixture.
  5. Fold in Strawberries: Gently fold in the sliced fresh strawberries into the pudding mixture, ensuring they are evenly distributed.
  6. Spread Filling over Graham Crackers: Spread the strawberry pudding mixture evenly over the layer of graham crackers in the baking dish.
  7. Prepare Strawberry Whipped Topping: In another mixing bowl, gently fold the thawed whipped topping (or homemade whipped cream) with the strawberry puree until well combined and a light pink color is achieved.
  8. Spread Whipped Topping: Spread the strawberry whipped topping evenly over the strawberry pudding layer in the baking dish.
  9. Add Second Graham Cracker Layer: Arrange another layer of graham crackers over the whipped topping. Again, break them as needed to cover the surface.
  10. Add Remaining Pudding and Strawberries: If you have any remaining strawberry pudding mixture, spread it over the second layer of graham crackers. Arrange any remaining sliced strawberries on top of the pudding.
  11. Top with Remaining Whipped Topping: Spread the remaining strawberry whipped topping evenly over the top layer.
  12. Chill the Cake: Cover the baking dish with plastic wrap and refrigerate the Strawberry Eclair Cake for at least 4 hours, or preferably overnight, to allow the graham crackers to soften and the flavors to meld together.
  13. Garnish and Serve: Before serving, you can garnish the cake with extra fresh strawberries, a sprinkle of graham cracker crumbs, or a drizzle of strawberry sauce, if desired. Slice and serve chilled.

Tips and Variations:

  • Pudding Flavor: While cheesecake flavor complements the strawberries nicely, you can also use vanilla, white chocolate, or even strawberry flavored instant pudding mix.
  • Whipped Cream: For a homemade whipped topping, whip 2 cups of heavy cream with ¼ cup powdered sugar and ½ teaspoon vanilla extract until stiff peaks form. Then fold in the strawberry puree.
  • Strawberry Sauce: You can make a simple strawberry sauce by simmering chopped strawberries with a little sugar and lemon juice until thickened. Cool before drizzling over the cake.
  • Other Fruits: Feel free to experiment with other fruits like sliced bananas, blueberries, or raspberries in place of or in addition to the strawberries. Adjust the flavor of the whipped topping accordingly.
  • Chocolate Version: For a more traditional eclair flavor, use vanilla pudding and top with a chocolate ganache instead of strawberry whipped topping.
  • Individual Servings: This recipe can also be assembled in individual serving dishes or small glasses for a more elegant presentation.
  • Layer Variations: You can create more layers of graham crackers, pudding, and whipped topping depending on the depth of your dish and your preference.

Enjoy this easy and refreshing Strawberry Eclair Cake! It’s a perfect no-bake treat for any occasion.

Top Ad 728x90