Top Ad 728x90

Wednesday, October 16, 2024

Chicken, Zucchini, and Fresh Corn Burgers

by


 Delight in Wholesome Goodness: WW-Friendly Chicken, Zucchini, and Fresh Corn Burgers


Introduction: Embark on a culinary journey brimming with vibrant flavors and wholesome ingredients with our Chicken, Zucchini, and Fresh Corn Burgers, thoughtfully tailored to meet the requirements of the Weight Watchers (WW) program. This delightful recipe combines lean ground chicken with nutritious zucchini and sweet fresh corn, creating a burger experience that’s both satisfying and low in points. Join us as we unveil the secrets behind crafting these flavorful burgers, ensuring every bite is a celebration of health and indulgence.
Ingredients
1 lb. lean ground chicken
1 medium zucchini, coarsely chopped
Kernels from 1 ear of fresh corn, husks and silk removed
1/2 medium red bell pepper, finely diced
1/4 cup finely chopped fresh parsley
2 cloves garlic, minced
1 teaspoon dried oregano
1/2 teaspoon paprika
Salt and pepper to taste
Optional: whole grain burger buns, lettuce leaves, tomato slices, avocado slices for serving
Instructions:

In a food processor, pulse the coarsely chopped zucchini until finely minced. Transfer the minced zucchini to a clean kitchen towel and squeeze out any excess moisture.
In a large mixing bowl, combine the ground chicken, minced zucchini, fresh corn kernels, finely diced red bell pepper, minced garlic, chopped parsley, dried oregano, paprika, salt, and pepper.
Use your hands or a spoon to mix the ingredients until well combined.
Divide the chicken mixture into equal portions and shape each portion into a burger patty.
Preheat a grill or grill pan over medium heat. Lightly grease the grill grates or pan with cooking spray.
Place the burger patties on the preheated grill or grill pan. Cook for 4-5 minutes on each side, or until the burgers are cooked through and golden brown on the outside. Use a meat thermometer to ensure the internal temperature reaches 165°F (74°C).
Once cooked, remove the burgers from the grill and let them rest for a few minutes before serving.
If desired, serve the burgers on whole grain burger buns or lettuce leaves, topped with tomato slices and avocado slices.
Nutritional Information (per serving, without bun or toppings):

Calories: 160
Total Fat: 8g
Saturated Fat: 2g
Cholesterol: 65mg
Sodium: 90mg
Total Carbohydrates: 5g
Dietary Fiber: 1g
Sugars: 2g
Protein: 18g
WW SmartPoints: 3 per serving

Conclusion: Elevate your burger game with our WW-Friendly Chicken, Zucchini, and Fresh Corn Burgers, where flavor meets nutrition in perfect harmony. These succulent burgers offer a delightful blend of lean protein, vibrant vegetables, and aromatic herbs, making them a guilt-free indulgence for your Weight Watchers journey. Whether grilled to perfection for a summer barbecue or enjoyed as a quick weeknight meal, these burgers promise to satisfy cravings while keeping you on track toward your wellness goals. Embrace the goodness of wholesome ingredients and savor the joy of balanced eating with every delicious bite.

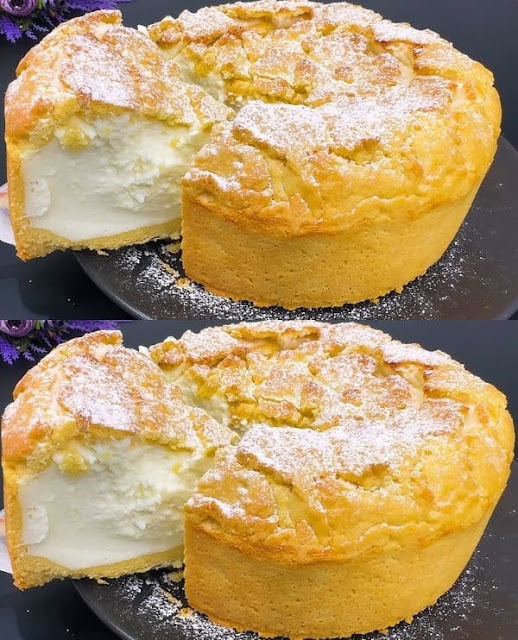
Discover the Magic of Creamy Yoghurt Cake

by


 If you haven’t yet experienced the joy of a Creamy Yogurt Cake, prepare to fall in love with this magical dessert! Combining a handful of basic ingredients, this cake is both light and moist, with a creamy texture that almost melts in your mouth. Whether you’re looking for a quick, wholesome treat to enjoy with your afternoon coffee or a dessert to wow guests with, this yogurt cake fits the bill. It’s simple, elegant, and above all, delicious.

Why Yogurt Cake?

  • Moist and Tender Texture: Yogurt adds incredible moisture, keeping the cake soft and fluffy for days.
  • Balanced Sweetness: Not overly sweet, making it perfect for any occasion.
  • Light and Creamy: The yogurt creates a delicate, almost custard-like texture without being too heavy.
  • Customizable: Add your favorite flavors, fruits, or glazes for a personalized touch.

Ingredients: What You’ll Need

  • 1 cup plain Greek yogurt (or your favorite yogurt)
  • ½ cup unsalted butter, softened
  • ¾ cup granulated sugar
  • 3 large eggs
  • 1 tsp vanilla extract
  • Zest of 1 lemon (optional, for a hint of freshness)
  • 1 ½ cups all-purpose flour
  • 2 tsp baking powder
  • ¼ tsp salt
  • ½ tsp baking soda
  • ¼ cup milk (whole or any preferred type)

Instructions: How to Make the Perfect Creamy Yogurt Cake

Step 1: Preheat and Prepare

  • Preheat your oven to 350°F (175°C) and grease a 9-inch round cake pan with butter or nonstick spray. Line the bottom with parchment paper for easy removal.

Step 2: Mix the Wet Ingredients

  • In a large bowl, beat together the butter and sugar until light and fluffy. This step helps incorporate air, resulting in a light cake.
  • Add the eggs, one at a time, beating well after each addition. Stir in the vanilla extract and lemon zest if using.
  • Next, fold in the Greek yogurt and mix until smooth and creamy. The yogurt is the star of the cake, so be sure it’s fully incorporated.

Step 3: Combine the Dry Ingredients

  • In a separate bowl, whisk together the flourbaking powderbaking soda, and salt.
  • Gradually add the dry ingredients to the wet mixture, alternating with the milk. Begin and end with the dry ingredients, mixing just until everything is combined. Be careful not to overmix—the key to a tender cake is a gentle hand.

Step 4: Bake the Cake

  • Pour the batter into the prepared pan and smooth the top with a spatula.
  • Bake for 35–40 minutes, or until a toothpick inserted into the center of the cake comes out clean. The cake should be golden brown on top and smell absolutely divine.
  • Allow the cake to cool in the pan for about 10 minutes before transferring it to a wire rack to cool completely.

Step 5: Serve and Enjoy

  • Once the cake is fully cooled, you can serve it as is or dust the top with powdered sugar for a touch of elegance. If you’re feeling adventurous, you can also drizzle it with a simple lemon glaze or serve with fresh berries and whipped cream.

Customizing Your Yogurt Cake

One of the best things about yogurt cake is its versatility. Here are a few ideas to make this cake your own:

  • Add fruits: Fold in fresh blueberries, raspberries, or diced peaches for a burst of fruity flavor.
  • Use flavored yogurt: Swap out plain yogurt for lemon, vanilla, or even strawberry yogurt to infuse the cake with subtle flavor variations.
  • Spice it up: Add a pinch of cinnamon, nutmeg, or cardamom to the batter for a warm, spiced version of the cake.
  • Glaze it: A lemon glaze made from lemon juice and powdered sugar adds a tangy-sweet finish that complements the creamy cake beautifully.

Storing and Serving Suggestions

This cake stores beautifully, staying moist and tender for up to 3 days when kept in an airtight container at room temperature. If you prefer, you can refrigerate the cake, and it will last even longer—up to 5 days. Just be sure to bring it back to room temperature before serving, or give it a few seconds in the microwave for a warm, fresh-out-of-the-oven taste.

Pair this cake with a cup of coffee or tea for a light afternoon snack, or dress it up with whipped cream and berries for an elegant dessert at your next gathering.

Frequently Asked Questions

Q: Can I use non-Greek yogurt for this cake?
A: Yes! Any plain yogurt will work well, though Greek yogurt tends to make the cake a bit creamier and richer in texture.

Q: Can I make this cake gluten-free?
A: Absolutely! Simply substitute the all-purpose flour with a good-quality gluten-free flour blend. Just be sure it’s one designed for baking.

Q: Can I freeze this cake?
A: Yes, this cake freezes well. Wrap it tightly in plastic wrap and store it in an airtight container for up to 3 months. Thaw at room temperature and enjoy!

The Magic of Yogurt Cake

The magic of Creamy Yogurt Cake lies in its simplicity. It’s the kind of cake that’s light and versatile enough to be enjoyed every day, yet special enough to be dressed up for any occasion. With its creamy texture, balanced sweetness, and endless customization options, this cake is bound to become one of your go-to recipes for a delicious, homemade treat that will have everyone asking for seconds. So, grab some yogurt and start baking—you’ll soon discover the magic for yourself!

I had this for dinner last night, and it was amazing!

by


 This traditional dish is guaranteed to please your appetite. The tasty meatloaf, smooth mashed potatoes, and melted cheese create a yummy and filling dinner.

List of ingredients:

For the Meatloaf:

Amount of Ingredients

Ground beef with 85% lean fat content, 2 pounds.

1 cup of breadcrumbs

1/2 cup of milk

Chopped onion: 1 medium.

Chopped garlic: 2 cloves

2 big eggs

1 tablespoon of Worcestershire sauce

Use half a teaspoon of salt and half a teaspoon of pepper.

1 teaspoon of dried thyme

Half a cup of ketchup

Two tablespoons of brown sugar.

To make the mashed potatoes:

Amount of Ingredients

2 pounds of peeled and chopped potatoes.

1/2 cup of milk

Butter without salt, 1/4 cup.

Add salt and pepper according to your preference.

Regarding the topping:

Amount of Ingredients

1 1/2 cups of grated cheddar cheese

Chopped fresh parsley to decorate.

Directions:

Heat the oven: Heat the oven to 350°F (175°C). Put oil in a baking dish that measures 9 by 13 inches.

Soak bread in milk: Mix breadcrumbs and milk in a small bowl. Leave it in the liquid for 5 minutes.

Prepare the meatloaf mixture: In a big bowl, mix together ground beef, breadcrumbs soaked in water, onion, garlic, eggs, Worcestershire sauce, salt, pepper, and dried thyme. Stir thoroughly.

Form the meat mixture into a loaf shape in the baking dish.

Prepare the topping by mixing ketchup, brown sugar, and Dijon mustard in a small bowl. Put on top of the meatloaf.

Cook in the oven for 50-60 minutes, or until the inside reaches a temperature of 160°F (71°C).

Prepare mashed potatoes: While the meatloaf is cooking, put diced potatoes in a big pot and cover them with cold water. Sprinkle a little salt and heat until boiling. Cook for 15 to 20 minutes, or until soft. Drain the liquid and put it back in the pot. Put milk and butter. Crush until soft and smooth. Add salt and pepper to taste.

Put together and bake: After the meatloaf is finished baking, cover the top with mashed potatoes. Put some grated cheddar cheese on top. Cook under the broiler for 3-5 minutes, or until the cheese is melted and bubbly.

Let the meatloaf sit for 10 minutes before cutting and serving. Sprinkle with chopped parsley.

Enjoy this tasty meatloaf with mashed potatoes and cheese!

I learned this version from my Amish

by


 Amish Pecan Cream Pie is a delicious mix of creamy goodness with the natural charm of pecan nuts. This pie comes from the center of Amish country and showcases the simple and delicious flavors of traditional Amish baking. This pie is a popular choice for holiday get-togethers. It has a delicious sweet and nutty flavor that is great for any celebration. It's a great way to honor the simple and traditional cooking of the Amish people, making it a dessert worth trying for anyone interested in authentic Midwestern sweets.

This pie is a great dessert option that goes well with a scoop of vanilla ice cream or a spoonful of freshly whipped cream. For a well-rounded meal, have it after a filling dinner of roasted chicken, mashed potatoes, and green beans. A warm coffee or a cold glass of milk makes this delicious pie even more enjoyable, turning it into a truly comforting dessert.

Pie de Nuez y Crema Amish

Number of portions: 8

Sugar & Co - Baking for Everyone

List of items needed to make a dish.

1 pie crust already baked in a 9-inch pan.

1 cup of white sugar

1/4 cup of cornstarch

1/4 of a teaspoon of salt

2 cups of full-fat milk

3 egg yolks from big eggs

2 tablespoons of butter without salt

1 teaspoon of vanilla flavoring

1 cup of chopped pecans

1 cup of thick cream

2 tablespoons of icing sugar

Instructions

1. In a pot, mix together the sugar, cornstarch, and salt.

Slowly stir in the milk until the mixture is creamy.

3. Cook on medium heat, stirring all the time, until the mixture becomes thick and starts boiling. Keep cooking for an additional 1 to 2 minutes.

In a little bowl, whisk the egg yolks. Gradually mix a little of the warm milk into the eggs to avoid curdling.

Put the egg mixture back in the pot and cook for 2 more minutes, stirring all the time.

Take the mixture off the heat and mix in the butter and vanilla extract until they are well mixed.

Mix in the chopped pecans.

Pour the mix into the pie crust that has been baked beforehand. Allow it to cool down to room temperature, then put it in the refrigerator for at least 4 hours or until it becomes firm.

In another bowl, beat the heavy cream with powdered sugar until it forms stiff peaks. Put the whipped cream on top of the cold pie.

Add more chopped pecans on top if you like before serving.

Different Types and Advice

Although the original recipe is tasty by itself, you can enhance the flavor by adding a bit of bourbon to the filling. For a healthier option, use half the regular sugar and replace it with maple syrup or honey. If you like a crispy texture, you can toast the pecans before putting them in the filling. For those who don't eat dairy, using a mix of coconut milk and coconut cream can be a great substitute.

Stuffed Mushrooms with Spicy Pepper

by


 Cheddar cheese, cream cheese, bacon, spicy jalapeños, and garlic are the ingredients in this delicious snack. These mushrooms are a tasty finger food that is great for any occasion due to the delicious filling inside them.

This amazing mixed dish is great for when you want snack ideas, are organizing a gathering, or can't choose between stuffed mushrooms and poppers. With each bite, you might discover different flavors and feelings.

No one leaves the buffet table without some of these tasty mushrooms with spicy jalapenos. Prepare these ahead of time and heat them up when you are ready. If you needed more reasons to try these mushroom poppers, they are also very low in carbs.

Since the mushroom poppers will be served hot, they need to cool down before you can eat them. Don't forget to give out napkins when serving finger foods.

Can you get them ready ahead of time?

You can prepare everything ahead of time, keep it in the refrigerator, and cook it when you want.

Use smoked gouda instead of cheddar and small peppers instead of mushrooms in this recipe. Use sun-dried tomatoes instead of bacon if you don't eat meat.

Ingredients needed:

The common white mushroom in its entirety

Pimientos rojos

Chopped fresh garlic.

Cheese that has been cut into small pieces.

Cheese spread

Bacon, cooked and cut into pieces.

INTRODUCING JALAPEÑO POPPER MUSHROOMS: the cooking instructions

Preheat the oven to 350°F.

Take out the stems of the mushrooms.

Mix cream cheese, bacon, garlic, cheddar cheese, and jalapenos without liquid.

Put a little bit of cream cheese on top of each mushroom.

Put them on a wire rack placed over a baking sheet lined with aluminum foil.

When the top looks bubbly and a nice golden color, bake in the oven for about 15 to 20 minutes.

I love these tasty bites. You can use them for any type of party. You should buy some now because they will be very popular and sell out quickly! You can also heat up leftover food again.

Instructions for storing: Put the leaves in a sealed container and keep them in the refrigerator for at least two to three days. Return them to the oven or air fryer to warm them up again.

Jalapeño popper mushrooms

Keep the recipe.

Bacon, cheese, and garlic are used to fill these delicious mushrooms. How tasty are these poppers when they are hot?

Length: 25 minutes Product: 24 ingredients in one set.

A total of twenty-four whole globe mushrooms

jalapeños (4 ounces, without liquid) from a can

2 pieces of garlic, finely chopped

half a cup of grated cheddar cheese

Eight ounces of cream cheese that has been softened.

chopped cooked bacon, 8 ounces

Cook food. Ensure that your screen does not turn off.

What actions should be taken next.

Preheat the oven to 350°F.

Take out the stems of the mushrooms.

Mix together cream cheese, bacon, garlic, cheddar cheese, and jalapenos that have been drained.

Put a little bit of cream cheese on top of each mushroom.

Put them on a metal rack placed over a baking tray lined with aluminum foil.

When the top looks bubbly and golden, bake in the oven for about 15 to 20 minutes.

Authored by Marie Cook Hours: 25

Did you create this recipe?

Share a photo and add a tag to let us know; we can't wait to see what you create!

Marie Rayner is a versatile person who has worked as a chef, writer, recipe creator, food blogger, and cookbook writer in her free time. She, her husband Todd, and their beloved English Cocker Spaniel, Mitzie, live in Chester, UK. "Life is too short to eat bad food," she says, as she aims to share easy and delicious recipes that anyone can cook at home.

Category: Main

Previous Article: "Beef and Cheesy Pocket Tacos"

Upcoming Article: "Easy Pecan Pie Recipe from the Southern United States"

Engaging with readers

Please respond.

Nobody will ever have access to your email address. Fields that are marked are necessary.

To leave comments in the future, store my name, email, and website on this browser.

The King Marie

Marie Rayner, who is from the UK, is now a freelance writer, recipe maker, food blogger, cookbook writer, and former chef. She runs the popular blog "The English Kitchen" to challenge misconceptions about English cooking, sharing recipes with a modern North American twist.

Black Bean Taco Salad

by


 INGREDIENTS
4 cups romaine lettuce, chopped
1 bell pepper, chopped
1 (15 oz) can black beans, rinsed and drained
1 (15 oz) can corn kernels, drained
1/2 cup tomatoes, diced
1/3 cup green onion, chopped
1/2 cup cheddar cheese, grated
1/3 cup tortilla chips, crushed

FOR THE DRESSING:
1/2 cup sour cream
1/4 cup salsa
1/2 teaspoon ground cumin
Juice of 1/2 a lime
Salt, to taste
PREPARATION
In a small bowl, stir together the ingredients for the dressing: the sour cream, salsa, cumin, lime juice, and salt. If using a chunky salsa, you can puree in a food processor if desired. Set aside or chill until ready to use.
In a large bowl, combine the lettuce, bell pepper, black beans, corn, tomatoes, green onion, cheddar cheese, and crushed tortilla chips.
Add desired amount of dressing and toss to combine. Enjoy!

Pecan Praline Cake

by


 Ingredients: For the Cake: 1 cup of soft unsalted butter.

2 cups of white sugar
4 big eggs
3 cups of regular flour
1 small spoon of baking powder
Half a teaspoon of baking soda
Half a teaspoon of salt
1 cup of full-fat milk
1 small spoon of vanilla flavor
1 and a half cups of chopped pecans (toasted)
Regarding the praline. Frosting:
1/2 cup of butter without salt
1 cup of packed brown sugar
1/4 cup of full-fat milk
1 teaspoon of vanilla flavoring
2 cups of powdered sugar (sifted)
1/2 cup of chopped pecans can be added as a topping if desired.

Directions:

For the dessert:
Heat your oven to 350°F (175°C) before using it. Put grease and flour on two cake pans that are 9 inches in diameter.
In a big bowl, mix the butter and sugar until it becomes light and fluffy.
Put the eggs in one by one, mixing well after each one.
In another bowl, mix the flour, baking powder, baking soda, and salt.
Mix the dry ingredients with the creamy mixture, adding milk in between. Start and finish with the dry ingredients. Stir until everything is mixed.
Add the vanilla extract and gently mix in the toasted pecans.
Put the same amount of batter into each of the cake pans that have been prepared.
Bake for 25-30 minutes or until a toothpick inserted in the middle comes out clean.
Allow the cakes to cool in the pans for 10 minutes, then flip them onto wire racks to cool completely.

To make the sweet icing, melt the butter in a saucepan on medium heat. Mix the brown sugar and milk together and heat until it boils. Cook for 1 minute while stirring continuously.
Take off the heat and mix in the vanilla.
Slowly mix the powdered sugar until the icing becomes smooth.
If the frosting becomes too thick, just add a bit more milk to make it thinner and easier to pour.
Putting together the cake:
Put one of the cold cake layers on a plate for serving.
Put a coating of the sweet icing on top.
Put the second cake layer on top and pour the rest of the icing over the cake, allowing it to flow down the sides.
You can add chopped pecans on top of the cake if you want to give it more flavor and make it look nicer.
Allow the frosting to harden before cutting and serving.
Enjoy your tasty Pecan Praline Cake!


Top Ad 728x90