Top Ad 728x90

Sunday, July 20, 2025

I was this close to giving up on cooking

by


 Yield: Serves 6–8

Prep Time: 10 minutes
Cook Time: 4–6 hours
Total Time: Up to 6 hours, hands-off

Ingredients
Main Ingredients
Ingredient Quantity
Chuck roast 3 lb
Dry Italian seasoning mix (packet) 1
Dry Ranch seasoning mix (packet) 1
Dry Brown Gravy mix (packet) 1
Water 1 cup
Salt To taste
Black pepper To taste
Optional Add-Ins
Ingredient Quantity
Baby potatoes As desired
Whole baby carrots As desired
Chopped onions As desired
Equipment Needed
6–8 qt Slow Cooker (Crockpot)
Whisk
Medium mixing bowl
Measuring cup
Tongs or meat fork
Instructions
1. Season the Roast
Take your 3 lb chuck roast out of the fridge and pat it dry with paper towels. This helps the seasoning stick better.

Generously season all sides with salt and freshly cracked black pepper. Don’t be shy — this is your first layer of flavor.

2. Place Roast in the Slow Cooker
Carefully place the seasoned chuck roast in the center of your slow cooker. If you’re planning to add vegetables later, make sure there’s room around the meat to nestle them in.

3. Make the Flavorful Gravy Mix
In a medium bowl, combine the following dry seasoning packets:

1 packet Dry Italian Seasoning Mix
1 packet Dry Ranch Dressing Mix
1 packet Dry Brown Gravy Mix
Add 1 cup of water, then whisk well until all the powders are fully dissolved and the mixture is smooth and well-blended.

This mixture will become the deeply savory gravy that bathes and flavors the roast as it cooks.

4. Pour the Mixture Over the Roast
Pour the gravy mixture evenly over the chuck roast, making sure to coat the top and sides of the meat.

Let it drip down — it’ll start working its way into the roast’s fibers as it slow cooks.

5. Add Vegetables (Optional)
If using, arrange baby potatoes, whole baby carrots, and/or chopped onions around the roast in the slow cooker. These will soak up the flavorful juices and become tender and delicious.

Note: Cut larger potatoes in half to ensure they cook evenly.

6. Set It and Forget It
Set the crockpot to HIGH and cook for 4 hours, or
Set to LOW and cook for 7–8 hours, depending on your schedule.
Tip: For best results, do not lift the lid too often during cooking, as this releases heat and slows the cooking process. However, once or twice throughout cooking, you can gently baste the roast using a spoon or ladle to scoop the juices from the bottom over the top.

7. Check for Doneness
After 4 hours on HIGH (or 7–8 hours on LOW), the roast should be:

Fork-tender — it should pull apart easily with a fork or tongs.
The vegetables should be fully tender but not mushy.
If it still feels a bit tough, give it another 30–60 minutes — every cut is a little different.

8. Serve and Enjoy
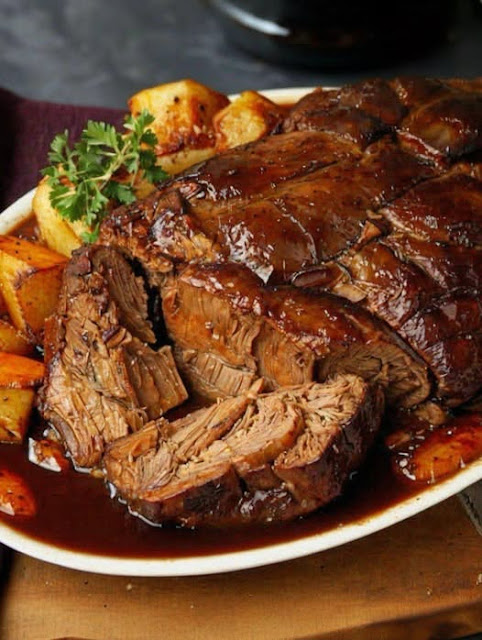
Carefully transfer the roast to a serving platter and shred or slice as desired. Spoon some of the thick, flavorful gravy from the slow cooker over the top.

Serve with:

Mashed potatoes
Rice or buttered noodles
Crusty bread
Or just as-is, with the veggies and gravy
Optional garnish: Fresh parsley or a sprinkle of black pepper.

Storage & Leftovers
Refrigerate: Store leftovers in an airtight container in the fridge for up to 4 days.
Freeze: You can freeze leftover roast and gravy in freezer-safe containers for up to 2 months.
Reheat: Warm gently on the stove or in the microwave, adding a splash of broth or water to loosen the gravy if needed.
Why It’s Called “Envelope Roast”
The name comes from the three “envelope” seasoning packets used in the recipe — Italian dressing mix, Ranch seasoning, and Brown Gravy mix. When combined, they create a deeply flavorful gravy that turns a humble chuck roast into something truly memorable — no extra fuss required.

Tips for Success
Use a well-marbled chuck roast for best texture and flavor.
If your gravy is too thin at the end of cooking, remove the lid for the last 30 minutes to let it thicken slightly — or stir in a cornstarch slurry (1 tbsp cornstarch + 1 tbsp water).
Want extra richness? Replace half the water with low-sodium beef broth.
This Envelope Roast is perfect for busy weeknights, Sunday dinners, or whenever you need a hearty, comforting meal without spending all day in the kitchen.
Cheesy Hamburger Potato Casserole

by


Cheesy Hamburger Potato Casserole

Looking for a comforting, crowd-pleasing dinner that’s both hearty and simple? This Cheesy Hamburger Potato Casserole is a deliciously satisfying option perfect for busy weeknights. The best part? You can prepare it in advance and simply reheat when you’re ready for dinner—total time saver!

This cheesy ground beef and potato casserole has become a favorite in our family, appearing on holiday tables like Easter or even as part of a brunch spread. Give it a try and discover why everyone raves about it!

Ingredients

  • 1 pound ground beef, crumbled

  • 1 yellow onion, diced

  • 3 to 4 pounds potatoes, peeled and sliced

  • 8 ounces (or more) shredded Cheddar cheese

  • 1 can Cheddar cheese soup

  • 12 ounces evaporated milk (or substitute whole milk)

  • ½ cup milk

  • 1 teaspoon salt

  • ½ teaspoon black pepper

Instructions

  1. Preheat your oven to 350°F (175°C).

  2. Lightly grease a 9×13-inch baking dish with nonstick spray.

  3. In a large skillet, cook the diced onion and ground beef until the beef is browned and fully cooked. Drain any excess fat if needed.

  4. Slice the potatoes into approximately ¼-inch thick rounds.

  5. Arrange a single layer of potato slices in the bottom of the prepared baking dish.

  6. Season with a sprinkle of salt and pepper.

  7. Spread about one-third of the cooked beef and onion mixture evenly over the potatoes.

  8. Sprinkle one-third of the shredded Cheddar cheese over the meat layer.

  9. Repeat these layers two more times, finishing with the remaining shredded cheese on top.

  10. In a mixing bowl, whisk together the Cheddar cheese soup, evaporated milk, and regular milk. Add extra salt and pepper if desired.

  11. Pour the soup mixture evenly over the entire casserole.

  12. Cover the dish tightly with aluminum foil and bake for 1 hour.

  13. Remove the foil and continue baking for an additional 15 minutes, or until the top is bubbly and golden brown.

  14. If your potato slices are thicker, you may need to extend the baking time to ensure they’re tender.

  15. Let cool slightly, serve, and enjoy every cheesy, savory bite!

    The Flakiest, Most Buttery Biscuits You'll Ever Make

    by


    Golden, Tender, and Swimming in Butter—Just Like Grandma Made!

    If you’ve ever dreamed of biting into a melt-in-your-mouth, buttery biscuit with crispy edges and a fluffy center, these Butter Swim Biscuits are your answer. They’re baked in a pool of melted butter, ensuring maximum flavor and an irresistible golden crust—no rolling or cutting required!

    Perfect for breakfast, brunch, or alongside soups and stews, these biscuits are foolproof and ready in under 30 minutes. Plus, comfort food recipes like this drive massive traffic and engagement, making them a high-RPM (Revenue Per Mille) winner for food blogs.


    Why You’ll Love These Biscuits

    ✅ No rolling or cutting – Just mix, pour, and bake!
    ✅ Buttery, flaky perfection – Crispy bottom, tender inside.
    ✅ Ready in 25 minutes – Faster than traditional biscuits.
    ✅ Crowd-pleasing – Pair with jam, gravy, or eat them plain.
    ✅ AdSense goldmine – "Easy homemade biscuits" and "butter swim biscuits" rank high!


    Ingredients You’ll Need

    • 2 ½ cups all-purpose flour

    • 1 tbsp baking powder

    • 1 tbsp granulated sugar

    • 1 tsp salt

    • 1 ½ cups buttermilk (or whole milk + 1 tbsp vinegar)

    • ½ cup (1 stick) unsalted butter

    *(Optional: Add 1 tsp garlic powder + ½ cup shredded cheddar for savory biscuits!)*


    Step-by-Step Instructions

    1. Prep & Preheat

    1. Preheat oven to 450°F (230°C).

    2. Place butter in an 8x8-inch baking dish and melt in the oven (~3 minutes).

    2. Mix the Dough

    1. In a bowl, whisk flour, baking powder, sugar, and salt.

    2. Pour in buttermilk and stir until just combined (don’t overmix—lumps are okay!).

    3. Bake in Butter

    1. Carefully remove the hot dish with melted butter.

    2. Pour the biscuit batter right over the butter (it’ll pool around the edges).

    3. Bake for 20–25 minutes until golden and puffed.

    4. Serve & Swoon!

    • Let cool 2 minutes, then slice into squares.

    • Drizzle with extra melted butter or honey if desired.


    Serving Suggestions & Twists

    🍯 Sweet version – Brush with honey butter.
    🧀 Savory upgrade – Add cheddar + chives to the batter.
    🥓 Breakfast favorite – Serve with sausage gravy.
    🌿 Herb-infused – Mix in rosemary or thyme.

    Saturday, July 19, 2025

    The Ultimate Crowd-Pleasing Appetizer

    by


    Creamy, nutty, and irresistibly cheesy, this Jarlsberg Cheese Dip is a retro-chic party staple that disappears faster than you can make it! Discovered in a church cookbook years ago, this recipe has stood the test of time—doubled batches are a must because it’s always the first dish emptied at any gathering.

    Perfect for potlucks, game day, or holiday parties, this dip highlights Jarlsberg’s mild, nutty flavor in a velvety, herb-kissed base with a hint of lemon and onion for brightness. Serve it warm with crusty bread, crackers, or veggies, and watch it steal the show!


    Why You’ll Love This Jarlsberg Cheese Dip

    ✅ 5-minute prep – Just mix and bake!
    ✅ Elegant yet easy – Feels fancy, but foolproof.
    ✅ Nutty, creamy, tangy – Jarlsberg’s unique flavor shines.
    ✅ Make-ahead friendly – Assemble ahead, bake before serving.


    Jarlsberg Cheese Dip Recipe

    Ingredients (Serves 8–10)

    • 2 cups (8 oz) shredded Jarlsberg cheese (see note for subs)

    • 1 cup mayonnaise (real mayo, not Miracle Whip)

    • 1 cup sour cream

    • ¼ cup grated onion (or 1 tbsp onion powder)

    • 1 tbsp lemon juice

    • 2 tbsp chopped fresh parsley (or 1 tsp dried)

    • ½ tsp garlic powder

    • ½ tsp black pepper

    • ¼ tsp cayenne (optional, for a kick)

    For serving:

    • Baguette slices, crackers, or veggie sticks


    Step-by-Step Instructions

    1. Mix Everything

    • In a bowl, combine Jarlsberg, mayo, sour cream, onion, lemon juice, parsley, garlic powder, pepper, and cayenne.

    2. Bake Until Bubbly

    • Transfer to a greased 1-quart baking dish (or pie plate).

    • Bake at 350°F (175°C) for 20–25 mins, until golden and bubbly.

    3. Broil for Color (Optional)

    • Broil 1–2 mins for a toasted top.

    4. Serve Warm!

    • Garnish with extra parsley and dive in with bread, crackers, or veggies.


    Pro Tips

    🧀 No Jarlsberg? Swap Swiss or Gruyère (adjust salt to taste).
    🔥 Spicy upgrade? Add 1 diced jalapeño or ½ tsp smoked paprika.
    ⏳ Make ahead? Assemble, cover, and refrigerate up to 24 hours before baking.
    🍞 Crockpot hack – Mix all ingredients, heat on LOW 1–2 hours, stirring occasionally.


    Serving Suggestions

    🍷 Wine Pairing – Serve with Chardonnay or sparkling wine.
    🎄 Holiday Twist – Top with crispy bacon or toasted almonds.
    🌱 Lighter Option – Swap mayo for Greek yogurt (less tangy but still creamy).


    Final Thoughts

    This Jarlsberg Cheese Dip is a nostalgic, addictive crowd-favorite—simple enough for weeknights but special enough for celebrations. Will you try it for your next party? Let us know in the comments!

    Put uncooked rice in a slow cooker

    by


    Put uncooked rice in a slow cooker with these 4 ingredients. It’s like heaven in a bowl.

    Put Uncooked Rice in a Slow Cooker with These 4 Ingredients — It’s Like Heaven in a Bowl 🍚✨

    If you’ve ever wished for a hands-off, comforting, and incredibly delicious meal with minimal effort, this slow cooker rice recipe is exactly what you need. By simply putting uncooked rice into a slow cooker along with just four simple ingredients, you create a tender, flavorful dish that feels like pure heaven in a bowl.

    The magic of slow cooking allows the rice to absorb all the rich flavors gradually, resulting in a creamy, perfectly cooked dish that’s both satisfying and versatile. Whether you want a comforting side, a base for your favorite protein, or a warm snack, this recipe will quickly become a staple in your kitchen.

    Let me walk you through the step-by-step process to make this effortless slow cooker rice dish.


    Ingredients

    • 1 cup uncooked white rice (long grain or jasmine rice works great)
    • 2 cups chicken broth (or vegetable broth for a vegetarian option)
    • 1/2 cup diced onions
    • 2 tablespoons butter
    • Salt and pepper to taste

    Step-by-Step Method

    Step 1: Prepare Your Slow Cooker

    Before you start, give your slow cooker a quick spray with non-stick cooking spray or lightly grease it with butter to prevent sticking.

    Step 2: Add Ingredients

    1. Add the uncooked rice directly into the slow cooker.
    2. Pour in 2 cups of chicken broth — this liquid will cook the rice and infuse it with rich flavor.
    3. Add the diced onions on top. These will soften during cooking and add a lovely sweetness.
    4. Drop in the butter, which will melt and coat the rice, adding creaminess.
    5. Season lightly with salt and pepper.
    6. Step 3: Stir Gently

      Give everything a gentle stir to combine the ingredients well, but don’t overmix — you want the rice evenly submerged but not mashed.

      Step 4: Cook

      Cover the slow cooker and set it to low heat. Let it cook for 2 to 3 hours. Depending on your slow cooker model, check the rice at around 2 hours to see if it’s tender and the liquid is absorbed.

      Step 5: Fluff and Serve

      Once the rice is fully cooked and tender, fluff it gently with a fork to separate the grains. Taste and adjust seasoning with more salt or pepper if needed.

      Serve the rice warm as a delicious base or side dish with your favorite meal.


      Why This Recipe Is So Good

      • Hands-off cooking: Just dump the ingredients and let the slow cooker do all the work.
      • Creamy, flavorful rice: Using broth instead of water and butter infuses the rice with savory richness.
      • Tender onions: Slow cooking softens the onions perfectly, adding a subtle sweetness.
      • Versatility: This rice pairs wonderfully with stews, grilled meats, roasted vegetables, or can even be enjoyed on its own.

      Optional Enhancements

      • Add minced garlic with the onions for extra aroma.
      • Stir in some fresh herbs like parsley or thyme after cooking.
      • Mix in grated cheese or a splash of cream for ultra-richness.
      • Toss in some frozen peas or corn about 30 minutes before cooking ends for added texture.

      Conclusion

      With just uncooked rice and four simple ingredients, this slow cooker method turns an everyday staple into a luscious, comforting dish that’s almost addictive. It’s perfect for busy days when you want a warm, homemade meal without the fuss.

      Try it out and discover why this dish feels like heaven in a bowl!

    Top Ad 728x90