Top Ad 728x90

Wednesday, October 23, 2024

Roasted Potato Slices

by


Ingredients:

– 4 large potatoes, peeled and cut into 1/2-inch thick slices
– 2 tablespoons olive oil
– 1 teaspoon salt
– 1/2 teaspoon black pepper
– 1 teaspoon garlic powder
– 1 teaspoon paprika
– Fresh rosemary sprigs (optional)
– 3-4 cloves garlic, peeled and slightly crushed (optional)
– 2 tablespoons unsalted butter, melted
– Fresh herbs (parsley or thyme) for garnish

Instructions:

1. **Preheat the Oven:**
– Preheat your oven to 400°F (200°C). Line a baking sheet with parchment paper or lightly grease it with oil.

2. **Prepare the Potatoes:**
– In a large bowl, toss the potato slices with olive oil, salt, black pepper, garlic powder, and paprika until they are evenly coated.

3. **Arrange on Baking Sheet:**
– Arrange the potato slices in a single layer on the prepared baking sheet. Make sure they are not overlapping to ensure even cooking.

4. **Add Rosemary and Garlic (Optional):**
– If using, scatter the fresh rosemary sprigs and crushed garlic cloves over the potato slices for added flavor.

5. **Roast the Potatoes:**
– Roast in the preheated oven for about 25-30 minutes, or until the potatoes are golden brown and crispy on the edges. Flip the slices halfway through the cooking time to ensure even roasting.

6. **Brush with Butter:**
– After roasting, brush the melted butter over the potato slices for added richness and flavor.

7. **Garnish and Serve:**
– Garnish with fresh herbs like parsley or thyme before serving.

Enjoy your delicious roasted potato slices as a side dish or a tasty snack!

Enjoy!


GARLIC AND BUTTER FLATBREAD

by


Ingredients:

350g of Flour

250g of Yogurt

1 tsp of Baking Powder

1 tsp of Salt

1 tsp of Sugar

2 cloves of Garlic

30g of Butter

Instructions:

Prepare the Dough:

Sift the flour into a bowl and create a well in the middle. In this well, add the yogurt, baking powder, sugar, and salt. Mix the ingredients together, gradually incorporating the flour from the sides until completely absorbed.

Form the Balls:

Knead the mixture into a soft dough and divide it into 8 balls. Let them rest for 5 minutes.

Roll Out the Dough:

Roll each ball into a thin disk and stack them, placing a sheet of baking paper between each flatbread to prevent sticking.

Cooking the Flatbreads:

Heat a pan over medium/high heat (level 7-8 out of 9). Lightly oil it and cook each flatbread for approximately one minute on each side.

Garlic and Butter:

Once removed, grease generously with butter and rub with sliced garlic cloves. If you prefer, you can also chop the garlic and sprinkle it over the hot, freshly made flatbreads.

Serving:

Serve and consume immediately as the garlic and butter flatbreads tend to become harder once they cool down.

Conclusion:

The Garlic and Butter Flatbread recipe is more than a mere guide to making bread; it’s an invitation to infuse your kitchen with the warmth of freshly baked delights and the aromatic allure of garlic and butter. So, gather your ingredients, preheat the oven, and let the magic unfold as you embark on a culinary adventure that promises not just a meal, but a symphony of flavors that will linger in your memory.

Enjoy!

Tuesday, October 22, 2024

CREAMY POTATO HAMBURGER SOUP

by


 Mike actually turned up his nose when I told him I was going to whip up this Creamy Potato & Hamburger Soup. He seriously thinks he doesn’t like hamburger in soups. Every time I talk about putting ground beef in a soup, he tells me he doesn’t like it. And then every single time I make a soup with ground beef in it, he loves it.

Ingredients

  • 1 1/2 pounds lean ground beef
  • 1 medium white onion peeled and diced
  • 1 large garlic clove minced
  • 6 cups of chicken broth
  • 6 cups of peeled & diced Russet potatoes
  • 2 cups of your favourite frozen vegetable mix
  • 3 teaspoons dried basil
  • 2 teaspoons dried parsley flakes
  • 1 1/2 cups milk
  • 2 tablespoons cornstarch
  • 8 ounces Velveeta cheese cubed

Instructions

In a large skillet ,fry the ground beef and onions until the onions are soft and the ground beef browned. Drain the grease.
Fry the garlic until browned and fragrant. Add the beef mixture to the crockpot or stockpot on the stove.
Add in the potatoes, broth, vegetables, basil and parsley.
Cook in the crockpot on low for 6-8 hours, on high for 3-4, or simmer on the stove until the potatoes are tender and starting to dissolve sightly.
Whisk the cornstarch into the milk, then whisk into the soup. Add the Velveeta and let it melt, stirring occasionally. When it’s melted in completely, spoon into bowls and serve.

Chicken Noodle Soup

by


 Dive into the quintessential comfort food that has won the hearts of many across the globe. The Chicken Noodle Soup, a timeless classic, embodies the warmth of home, the embrace of a loved one, and the rejuvenating powers of good food. Whether you’re under the weather, caught in a chilly breeze, or simply craving a taste of nostalgia, this bowl promises a comforting hug with every spoonful.

Hey there, home cooks! There’s something supremely comforting about a piping hot bowl of Chicken Noodle Soup, isn’t there? It’s the classic go-to when you’re feeling under the weather, or when you’re just craving a warm, hearty, and satisfying meal. Today, we’re going to revisit this all-time favorite, crafting it from scratch in our own kitchens

Our Chicken Noodle Soup is all about a flavorful broth, tender chicken, and hearty noodles all mingling together. It’s the kind of meal that fills you up and warms you from the inside out. It’s not just a soup, but a bowl of nostalgia and comfort, reminding us of the homespun meals of our childhood . 

Here’s what you’ll need :

2 tablespoons of olive oil
1 medium onion, chopped
2 carrots, peeled and sliced
2 celery stalks, chopped
2 cloves garlic, minced
1 pound of chicken breasts or thighs
6 cups of chicken broth
1 bay leaf
Salt and pepper to taste
2 cups of egg noodles
Fresh parsley, chopped (for garnish)

Now, let’s put it all together :

Start by heating the olive oil in a large pot over medium heat. Once hot, add the onion, carrots, and celery, sautéing until they begin to soften.

Add the garlic and sauté for another minute until fragrant.

Now, it’s time for the chicken. Nestle the chicken into the pot, then pour in the chicken broth. Throw in the bay leaf and season with a pinch of salt and pepper.+

Bring your soup to a boil, then reduce the heat to low and let it simmer. Cook until the chicken is tender and fully cooked through, about 20-30 minutes.

Once your chicken is cooked, remove it from the pot and shred it into bite-sized pieces. Return the shredded chicken to the pot.

Now, add your egg noodles to the pot and stir. Let your soup continue to simmer until the noodles are cooked to your liking.

Finally, taste your soup and adjust the seasoning with more salt and pepper, if needed.

Serve your Chicken Noodle Soup hot, garnished with a sprinkle of fresh parsley for a pop of color and freshness.

 Most popular Questions:

  1. What gives chicken soup the most flavor?

    Answer: Several factors contribute to the rich flavor of chicken soup:

    • Chicken Bones and Skin: Using chicken pieces with the bones and skin intact can significantly enhance the depth of flavor. The bones release collagen, which not only enriches the flavor but also gives the soup a silky texture.
    • Fresh Herbs and Aromatics: Ingredients like onions, garlic, celery, and carrots (often referred to as mirepoix) are fundamental in building a flavorful base. Fresh herbs like thyme, rosemary, and parsley can also elevate the soup’s aroma and taste.
    • Simmering Time: Slow simmering allows the flavors to meld and deepen. The longer you can let the soup gently simmer (without overcooking the vegetables or chicken), the richer the flavor will be.
    • Good Quality Broth/Stock: Starting with a high-quality chicken broth or stock makes a significant difference. Homemade is often best, but there are also quality store-bought options available.
  2. How to enhance the flavor of chicken noodle soup?

    Answer: To further enhance the flavor of chicken noodle soup, consider the following tips:

    • Roasting: Roast the chicken bones and vegetables (like carrots, onions, and celery) before adding them to the soup. This caramelizes the ingredients and intensifies their flavors.
    • Bay Leaves and Peppercorns: Add these to the simmering soup for an extra layer of depth.
    • Acidity: A splash of lemon juice or a hint of vinegar can brighten the flavors.
    • Finish with Fresh Herbs: Before serving, stir in freshly chopped parsley, dill, or chives.
    • Adjust Seasoning: Salt is essential. Always taste and adjust the seasoning before serving.
  3. Is it better to cook chicken before adding to soup?

    Answer: It depends on the method and desired outcome:

    • For a clearer broth: It’s preferable to start with raw chicken, as the slow simmering of the chicken with the soup will release its natural flavors into the broth.
    • For a quick-cooking soup: Pre-cooked chicken, such as rotisserie chicken, can be added. This method is faster and offers a slightly different flavor profile, as the chicken won’t impart as much flavor to the broth.
    • For depth of flavor: You can sear or brown the chicken pieces first to add a roasted note to the soup, then continue to simmer them.
  4. How to make chicken noodle soup a little thicker?

    Answer: If you prefer a thicker chicken noodle soup, here are a few methods:

    • Flour or Cornstarch: Make a slurry by mixing a few tablespoons of flour or cornstarch with cold water. Slowly whisk this into the simmering soup until it thickens to your desired consistency.
    • PurĂ©e Vegetables: Remove some of the vegetables from the soup, purĂ©e them, then stir them back into the soup.
    • Reduce: Simply allow the soup to simmer for a longer time, which will reduce the liquid and concentrate the flavors.
    • Add Cream: For a creamier, richer soup, consider adding a splash of heavy cream or half-and-half.
    • Use Pasta Water: If you’re boiling noodles separately, the starchy pasta water can be added to the soup to thicken it slightly.

Remember, the beauty of soup is its versatility. Feel free to tweak recipes based on your personal preferences!

Voila ! You’ve just made a classic Chicken Noodle Soup from scratch. Whether it’s for a casual weeknight dinner, a caring meal for a sick friend, or a soothing pick-me-up on a cold day, this soup is sure to hit the spot. So, grab your biggest spoon and get ready to enjoy some homestyle comfort

Easy mini Chicken Pot Pies

by


 These are such a fun and delicious meal idea when you have a craving for comfort food!

Ingredients:

2 cans of refrigerated biscuits (8 count each can)

1/2 pound of boneless, skinless chicken breast (approximately 1 large breast)

1 bag frozen peas and carrots

1 can cream of chicken soup

Cooking spray for pan

 Instructions:

Preheat oven to 350 degrees F and spray muffin tin with cooking spray
Chop chicken into small bite sized pieces. Cook over med-high heat until no longer pink. Add any spices desired (I use garlic powder, onion powder, and a pinch of salt but you can use whatever you like) remove from heat
Stir veggies and soup into pan with chicken. Set aside.
Open biscuits and flatten to make thin enough to fit into cups. Fill biscuits with chicken mix and bake at 350 for 30-35 min or until biscuits are golden brown.
If you only use 1 can of biscuits, keep recipe the same and the unused portion of chicken mix can be frozen for up to 2 months to use as a second meal

Enjoy!

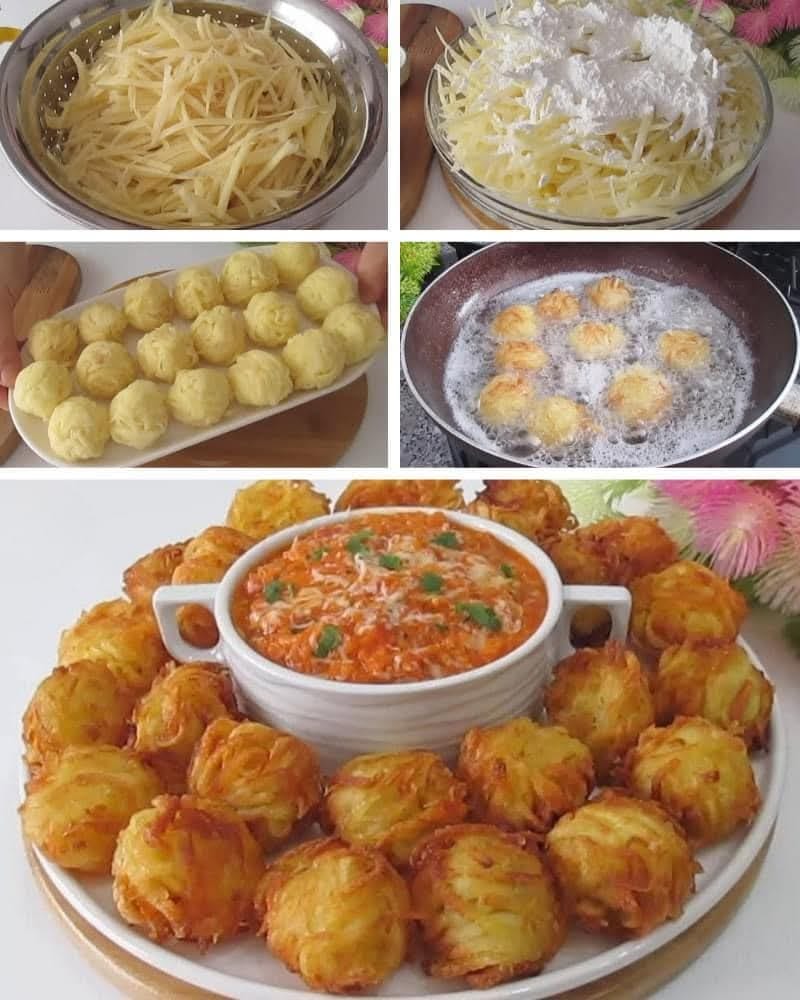
Starchy Crispy Potato Balls Recipe

by


Starchy Crispy Potato Balls Recipe

Introduction

Starchy Crispy Potato Balls are a delightful treat that combines the comforting flavors of mashed potatoes with a satisfying crunch. Perfect as a snack or appetizer, these golden-brown delights are easy to make and sure to please a crowd. Whether served at a party or enjoyed as a cozy family dinner, they can be customized with various fillings and dipping sauces to suit any palate.

History

The concept of frying potatoes dates back centuries, with various cultures developing their own versions of potato fritters and croquettes. Potatoes, introduced to Europe from South America in the 16th century, quickly became a staple ingredient in many cuisines. These crispy potato balls can be seen as a modern twist on classic potato recipes, combining traditional cooking methods with contemporary flavors and textures.

Ingredients

  • 4 large starchy potatoes (Russet or Idaho work best)
  • 2 tablespoons butter
  • 1/4 cup milk (or cream for a richer flavor)
  • 1/2 cup shredded cheese (optional, cheddar or mozzarella work great)
  • 1/2 teaspoon garlic powder
  • 1/2 teaspoon onion powder
  • 1/2 teaspoon salt
  • 1/4 teaspoon black pepper
  • 1/2 cup all-purpose flour
  • 2 large eggs, beaten
  • 1 1/2 cups breadcrumbs (panko for extra crunch)
  • Oil for frying (vegetable or canola)

Benefits

These Starchy Crispy Potato Balls offer several benefits:

  • Nutrient-Dense: Potatoes are rich in vitamins and minerals, particularly vitamin C, vitamin B6, and potassium.
  • Versatile: The recipe can be easily customized with different herbs, spices, or fillings to suit individual tastes or dietary needs.
  • Social Food: Perfect for gatherings, they encourage sharing and enjoying food together, fostering connections among friends and family.

Method

  1. Cook the Potatoes:
    • Peel and cut the potatoes into chunks. Boil them in salted water until they are fork-tender, about 10-15 minutes.
    • Drain the potatoes and mash them while they are still warm.
  2. Prepare the Potato Mixture:
    • Add the butter, milk, garlic powder, onion powder, salt, and pepper to the mashed potatoes. Stir until smooth and creamy.
    • If you’re using cheese, fold it into the mashed potatoes. Let the mixture cool slightly so it’s easier to handle.
  3. Shape the Potato Balls:
    • Take a small amount of the potato mixture (about 2 tablespoons) and roll it into a ball using your hands.
    • Repeat until all the mashed potatoes are formed into balls.
  4. Bread the Potato Balls:
    • Set up a breading station with three bowls: one with flour, one with beaten eggs, and one with breadcrumbs.
    • Roll each potato ball in the flour, shaking off any excess.
    • Dip it into the beaten eggs, then coat it in the breadcrumbs, pressing gently to ensure the breadcrumbs stick well.
  5. Fry the Potato Balls:
    • Heat oil in a deep frying pan or pot to about 350°F (175°C).
    • Fry the potato balls in batches, making sure not to overcrowd the pan. Fry for 2-3 minutes, turning occasionally, until they are golden brown and crispy.
    • Remove the potato balls with a slotted spoon and place them on a plate lined with paper towels to drain excess oil.
  6. Serve:

    Serve the crispy potato balls hot, with a dipping sauce of your choice. They pair well with ketchup, sour cream, or a spicy aioli.

Nutrition

Each serving of Starchy Crispy Potato Balls provides a satisfying blend of carbohydrates and fats. The potatoes contribute to your daily intake of essential nutrients, while the optional cheese adds protein and calcium. When paired with nutritious dipping sauces, they can be part of a balanced diet.

Conclusion

Starchy Crispy Potato Balls are a fantastic way to enjoy the humble potato in a new and exciting form. Their crunchy exterior and creamy interior make them irresistible, whether you’re enjoying them as a snack or a side dish. Perfect for parties, family gatherings, or a cozy night in, these potato balls are sure to be a hit. So gather your loved ones, whip up a batch, and enjoy the delightful flavors and textures together!

Lovers

This recipe is perfect for anyone who appreciates the comforting taste of potatoes and enjoys experimenting in the kitchen. It’s a great dish for families, friends, or anyone looking to share good food and create memorable moments. With their easy preparation and delicious results, Starchy Crispy Potato Balls are destined to become a favorite for many!

WOULD YOU EAT THIS CHINESE BEEF

by


 Ingredients:

For the stir fry:
1 lb beef (flank steak or sirloin), thinly sliced against the grain
2 large onions, sliced
2-3 cloves garlic, minced
2 tbsp vegetable oil (or sesame oil)
1 tbsp ginger, minced (optional)
1/4 cup soy sauce
2 tbsp oyster sauce (optional)
1 tbsp cornstarch
1/2 cup beef broth (or water)
1 tbsp sugar (to balance flavors)
Salt and pepper, to taste
Green onions, chopped (for garnish)
Sesame seeds (for garnish, optional)
Instructions:
Marinate the beef:

In a bowl, combine the sliced beef with soy sauce, cornstarch, and a pinch of salt. Let it marinate for at least 15 minutes while you prepare the other ingredients.
Prepare the sauce:

In a separate bowl, mix together the remaining soy sauce, oyster sauce, beef broth, sugar, and pepper. Set aside.
Stir fry the beef:

Heat 1 tablespoon of oil in a large skillet or wok over high heat. Add the marinated beef and stir fry for about 2-3 minutes, or until browned and cooked through. Remove the beef from the skillet and set aside.
Cook the onions and garlic:

In the same skillet, add the remaining oil. Add the sliced onions and cook for about 3-4 minutes until they start to soften. If using, add the ginger and garlic, cooking for an additional minute until fragrant.
Combine and finish:

Return the beef to the skillet and pour in the sauce mixture. Stir everything together and cook for another 2-3 minutes until the sauce thickens slightly and the beef is heated through.
Serve:

Garnish with chopped green onions and sesame seeds if desired. Serve hot over steamed rice or noodles.
Helpful Tips:
For a complete meal, add your favorite vegetables such as bell peppers, broccoli, or snap peas to the stir fry.
If you prefer a spicier kick, add sliced chili peppers or a splash of chili sauce to the stir fry.
Enjoy your Chinese Beef and Onion Stir Fry!

Top Ad 728x90