Top Ad 728x90

Thursday, July 17, 2025

Copycat Joe’s Crab Shack Crab Cakes

by


If you’ve ever dined at Joe’s Crab Shack and found yourself dreaming about those golden-brown, flavor-packed crab cakes , you’re not alone.

Those first bites — crisp on the outside, tender and seasoned inside — are the kind of culinary magic most home cooks want to recreate.

Well, good news: you can!

With this copycat crab cake recipe , you’ll be able to enjoy the same restaurant-quality taste from the comfort of your own kitchen.

Let’s walk through how to make these moist, flavorful crab cakes — and why they deserve a spot on your summer dinner table.


Why You’ll Love These Crab Cakes

There are so many reasons to give this copycat recipe a try:

Restaurant Flavor at Home – Mimics the texture and seasoning of Joe’s Crab Shack
Crispy on the Outside, Tender Inside – Just like the real thing
Perfect for Summer Grilling or Weeknight Dinners – Light, refreshing, and easy to prep
Great for Seafood Lovers and Entertaining – Impressive enough for guests, simple enough for solo meals
Uses Real Lump Crab Meat – Or imitation if preferred

Whether you're hosting friends, feeding the family, or just craving something fancy without the high price tag, these crab cakes deliver every time.


What You'll Need

Ingredients:

  • 1 lb lump crab meat (or canned crab or imitation crab)
  • ¼ cup mayonnaise
  • 1 tbsp Dijon mustard or Worcestershire sauce
  • 1 tsp Old Bay seasoning
  • ½ tsp garlic powder
  • ½ tsp onion powder
  • 1 tbsp finely chopped green onions or parsley
  • ¾ cup panko breadcrumbs (plus more for coating)
  • 1 egg (to bind)
  • Salt and pepper to taste
  • Butter or oil for frying

Step-by-Step Instructions

🔪 Step 1: Mix the Ingredients

In a large bowl, gently mix together crab meat, mayonnaise, mustard, Old Bay, garlic powder, onion powder, green onions, breadcrumbs, and egg. Season lightly with salt and pepper.

Tip: Handle the mixture gently — overmixing can break up the delicate crab pieces.

🥄 Step 2: Form the Cakes

Using your hands, shape the mixture into 4–6 crab cakes , depending on size preference. Chill in the fridge for 20–30 minutes to help them hold their shape.

🧈 Step 3: Coat and Pan-Fry

Lightly coat both sides of each cake with additional panko breadcrumbs. In a skillet over medium heat, melt butter or add oil and cook the crab cakes for 3–4 minutes per side , or until golden brown and crispy.

🍋 Step 4: Serve and Enjoy!

Serve warm with lemon wedges, tartar sauce, or remoulade — and enjoy your homemade Joe’s Crab Shack-inspired dish .


Tips for Perfect Crab Cakes Every Time

✅ Use real lump crab meat if possible — it delivers superior flavor and texture
✅ Keep the mixture chilled before frying — helps prevent crumbling
✅ Don’t overdo the filler — too much breadcrumb can make cakes dry
✅ Gently fold ingredients — preserve big chunks of crab for better bite
✅ Fry in butter for extra richness — or bake for a lighter version
✅ Avoid pressing down while cooking — let them crisp naturally

These small steps make a big difference in recreating that signature Joe’s Crab Shack experience at home.


Creative Ways to Customize Your Crab Cakes

Once you’ve got the base right, here are some fun twists to try:

🧂 Classic Southern Style

Add a splash of hot sauce or cayenne for a spicy kick

🌿 Fresh Herb Boost

Mix in fresh dill, chives, or cilantro for added brightness

🥑 Make It Mini

Form into smaller patties for appetizers or party bites

🍽️ Baked Option

Place on a wire rack and bake at 400°F for 15–18 minutes, flipping halfway through

🍋 Lemon & Herb Serving Style

Top with lemon-dill aioli or serve alongside a light arugula salad


Frequently Asked Questions (FAQs)

Q: Can I use canned crab instead of fresh?
A: Yes — drain well and pick through for any shell bits. Fresh is best, but canned works in a pinch.

Q: Are these crab cakes spicy?
A: Not by default — but you can easily add hot sauce or Cajun seasoning for heat.

Q: Can I make these ahead of time?
A: Absolutely! Form the cakes and refrigerate for up to a day before frying.

Q: How do I keep crab cakes from falling apart?
A: Chilling the mixture and using the right amount of binder (egg + breadcrumbs) helps them stay intact.

Q: What can I serve with crab cakes?
A: Coleslaw, cornbread, grilled veggies, or a fresh avocado salad all pair beautifully.


Final Thoughts

Crab cakes don’t have to mean a trip to the seafood joint — especially when you can recreate the golden crust and moist, seasoned center of Joe’s Crab Shack right in your own kitchen.

With just a few quality ingredients and a bit of care, you can bring that restaurant-favorite flavor home — no apron required (okay, maybe one).

So next time you're craving a taste of summer seafood indulgence, reach for this simple yet satisfying recipe .

You might just forget you didn’t order it off a menu.

Put Raw Sliced Onions in a Slow Cooker with These 2 Ingredients

by


 Sometimes the most comforting dishes don’t require a dozen spices, hours of prep, or a trip to a specialty store. All it takes is a few humble ingredients and a little patience — and your slow cooker will do the rest.

One of the simplest slow cooker recipes with surprisingly rich flavor starts with something most of us already have on hand: raw sliced onions. Combine them with just two other basic ingredients, and you’ll create a dish so savory and satisfying, it tastes like it simmered in a French bistro — but it came from your kitchen.

Let’s unlock this delicious secret.


The Three-Ingredient Magic

Here’s all you need:

  • 3–4 large onions, thinly sliced (yellow or sweet onions work best)

  • 2 tablespoons of butter

  • 1 tablespoon of balsamic vinegar (or Worcestershire sauce for a deeper umami flavor)

That’s it. No stock. No salt. No sugar. Just these three ingredients — and time — to create caramelized, melt-in-your-mouth onions packed with flavor.


What Happens in the Slow Cooker?

When you put raw onions in a slow cooker with butter and balsamic vinegar, a quiet transformation begins.

Over several hours, the onions break down slowly. The natural sugars are released and caramelized gently by the heat and acidity of the vinegar. The butter adds richness and silkiness. The result is deeply golden, sweet-savory onions with a jam-like texture and an irresistible aroma.


How to Make It

Ingredients:

  • 3–4 large onions, peeled and thinly sliced

  • 2 tablespoons unsalted butter

  • 1 tablespoon balsamic vinegar or Worcestershire sauce

Directions:

How to Make It

Ingredients:

  • 3–4 large onions, peeled and thinly sliced

  • 2 tablespoons unsalted butter

  • 1 tablespoon balsamic vinegar or Worcestershire sauce

Directions:

  1. Layer the onions
    Place the sliced onions into the bottom of your slow cooker.

  2. Add butter and vinegar
    Dot the butter across the top of the onions. Drizzle the balsamic vinegar (or Worcestershire sauce) evenly.

  3. Set it and forget it
    Cook on low for 8–10 hours, or high for 4–5 hours, stirring once or twice if you're home. The onions should turn deep golden brown, soft, and fragrant.


What You Can Do with These Onions

Once done, these rich caramelized onions become a kitchen powerhouse. Here’s how you can use them:

  • Grilled cheese upgrade: Add a scoop to your sandwich for a gourmet twist.

  • Burger topping: Better than anything you’ll find at a diner.

  • Pizza or flatbread: Pile them on with goat cheese or sausage.

  • Steak or chicken topping: Adds instant flavor depth to simple proteins.

  • Soup base: Stir into broth for a quick, rustic onion soup.

  • Quiche or omelet filler: For an earthy, sweet-savory boost.

You can also store them in the fridge for up to a week or freeze them in small portions for future meals.


Why This Recipe Works

  • Minimal effort: Just slice, dump, and walk away.

  • Big payoff: Rich flavor from everyday ingredients.

  • Healthy comfort: No added sugar or preservatives — just real food.

  • Budget-friendly: Onions are inexpensive and filling.


Final Thoughts

With nothing but raw sliced onions, a little butter, and a splash of vinegar, you can transform basic pantry staples into a dish that feels elevated and cozy all at once. It’s a recipe that proves the best meals often start with the simplest ingredients — and a little slow-cooked patience.

Try it once, and you’ll never look at an onion the same way again

Baked Cauliflower Tastes Better Than Meat

by


 Cauliflower is one of the most underrated vegetables in the kitchen, yet when prepared the right way, it can be transformed into a crispy, flavorful, and satisfying dish that rivals even the best cuts of meat. My recipe for crispy roasted cauliflower proves just how versatile and delicious this humble vegetable can be. With a golden, crunchy exterior and a tender, flavorful inside, this dish is perfect as a snack, side, or even a main course. 


Let’s dive into the step-by-step process of making crispy roasted cauliflower that tastes better than meat! 

Ingredients 

To make this delicious crispy roasted cauliflower, you’ll need: 

• 1 medium cauliflower head (cut into bite-sized florets) 
• 3 tbsp olive oil (or melted butter for extra richness) 

• ½ cup breadcrumbs (panko for extra crispiness) 

• ½ cup grated Parmesan cheese (optional but recommended) 

• 1 tsp garlic powder 

• 1 tsp onion powder 

• 1 tsp smoked paprika (for a deep, smoky flavor) 

• ½ tsp chili flakes (optional for heat) 

• Salt and black pepper to taste 

• 1 tbsp cornstarch (helps create extra crispiness) 

• 1 egg (or plant-based alternative for a vegan version)

Step-by-Step Instructions 


Step 1: Prepare the Cauliflower 

Start by washing the cauliflower and cutting it into evenly sized florets. This ensures that all the pieces cook at the same rate. Pat them dry using a paper towel—removing excess moisture helps the florets crisp up in the oven. 

Step 2: Preheat the Oven 

Set your oven to 220°C (425°F). A high temperature is key to achieving a crispy texture without making the cauliflower soggy. 

Step 3: Coat the Cauliflower 

In a large bowl, whisk together the olive oil (or melted butter), garlic powder, onion powder, smoked paprika, chili flakes, salt, and pepper. Toss the cauliflower florets in this mixture, ensuring they are evenly coated. 

Step 4: Add the Crispy Coating 
In a separate bowl, mix the breadcrumbs, Parmesan cheese, and cornstarch. If you prefer a thicker coating, dip each cauliflower floret into a beaten egg before rolling it in the breadcrumb mixture. 

Step 5: Arrange on a Baking Sheet 

Line a baking sheet with parchment paper and spread the coated cauliflower evenly. Make sure the florets aren’t overcrowded—this allows them to crisp up rather than steam. 

Step 6: Roast to Perfection 

Place the baking sheet in the preheated oven and bake for 25-30 minutes, flipping the florets halfway through for even crispiness. They should turn golden brown and crunchy on the outside while remaining tender inside. 

Step 7: Serve and Enjoy 

Once out of the oven, let the cauliflower cool for a few minutes. Serve with your favorite dipping sauce—garlic aioli, spicy mayo, or a tangy yogurt dip all work wonderfully. 

Why Does This Taste Better Than Meat? 


• Crispy & Flavorful – The combination of a crunchy coating and roasted caramelized cauliflower creates a texture that’s hard to resist. 

• Healthier Alternative – Cauliflower is packed with fiber, vitamins, and antioxidants, making it a nutritious substitute for fried meats. 

• Umami Boost – Ingredients like Parmesan and smoked paprika add a deep, savory flavor, making this dish incredibly satisfying. 

• Versatile Dish – You can enjoy this as a snack, a side dish, or even as a filling for tacos or wraps! 

Final Thoughts 

This crispy roasted cauliflower recipe is a game-changer. It’s crunchy, flavorful, and incredibly satisfying—proving that vegetables can be just as delicious (if not better) than meat. Give this recipe a try and see for yourself! 

A Delightful Dessert for True Coffee Lovers

by


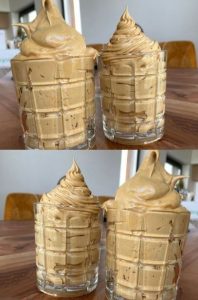
2-Minute Coffee Mousse: A Delightful Dessert for True Coffee Lovers

If you’re a coffee enthusiast who occasionally craves a sweet treat but doesn’t have the time or patience for elaborate desserts, this 2-minute coffee mousse is exactly what you need. It’s quick, simple, and perfectly complements your cup of coffee with a creamy, velvety texture and rich coffee flavor — all without the fuss of baking or complicated preparations.

This dessert is ideal for those moments when a sudden craving strikes, whether mid-afternoon or after dinner, and you want something indulgent but effortless. Plus, it’s incredibly versatile and can be customized to suit your personal taste and mood.

Ingredients (serves 1 generous portion):

  • 100 ml (1 dl) strong, cold black coffee — freshly brewed and cooled or iced coffee works best for a vibrant coffee flavor. Using cold coffee ensures the mousse sets nicely and retains its texture.

  • 1 tablespoon instant coffee powder — this boosts the coffee intensity and adds depth to the mousse. Feel free to adjust this amount depending on how strong you like your coffee taste.

  • 1 tablespoon sugar or sweetener — add to your liking; you can use white sugar, brown sugar, honey, maple syrup, or any alternative sweetener you prefer.

  • 2 tablespoons mascarpone cheese — this Italian cream cheese brings a rich, smooth, and slightly tangy flavor. If you prefer a lighter version, substitute mascarpone with thick Greek yogurt, which still provides creaminess but with fewer calories.

  • Cocoa powder for dusting (optional) — a light sprinkle adds a touch of elegance and a hint of chocolate aroma.

Step-by-Step Preparation (takes about 2 minutes):

  1. Prepare your coffee:
    If you don’t already have cold coffee ready, brew a strong cup of your favorite coffee and let it cool to room temperature or chill it briefly in the fridge. The coffee should not be hot or it will melt the mascarpone and change the texture of the mousse. For a refreshing summer twist, use iced coffee or add a few ice cubes to your cup before mixing.

  2. Combine the base ingredients:
    In a small bowl, cup, or mug, pour the cold black coffee. Add the instant coffee powder and sugar or sweetener. Stir gently but thoroughly until the instant coffee granules and sugar dissolve completely. This ensures a smooth base without gritty bits.

  3. Add the creamy element:
    Spoon in the mascarpone cheese or Greek yogurt. The mascarpone is key to achieving the luxurious, creamy mouthfeel that mimics a mousse without the need for eggs or heavy whipping.

  4. Whisk to fluff:
    Using a small whisk or a fork, beat the mixture vigorously. This step incorporates air and blends the mascarpone evenly throughout the coffee, creating a light, fluffy consistency. While it won’t be as airy as a traditional mousse made with whipped cream or egg whites, the result is a satisfyingly creamy dessert with a pleasant, mousse-like texture.

    1. Serve and garnish:
      Pour or spoon the mousse into a small serving glass or bowl. For an added touch of flavor and presentation, dust the top with cocoa powder. You can also garnish with chocolate shavings, a few whole coffee beans, or a sprinkle of cinnamon if you like.

    Tips and Flavor Variations to Elevate Your Coffee Mousse

    • Amp up the coffee: For those who adore a powerful coffee kick, simply increase the instant coffee powder to 2 tablespoons. This will deepen the coffee aroma and intensity, making it more robust and energizing.

    • Chocolate lovers rejoice: Mix in a teaspoon of unsweetened cocoa powder or melted dark chocolate into the coffee mixture before adding mascarpone for a luscious mocha flavor. You can also dust cocoa powder or grated chocolate on top for extra decadence.

    • Adult twist: Add a splash of coffee-flavored liqueur like Kahlúa, Tia Maria, or your favorite coffee-infused spirit. This gives the mousse a rich complexity and warmth — perfect for an after-dinner treat.

    • Whipped cream indulgence: Top your mousse with a dollop of whipped cream for a creamy, airy finish. This step takes only seconds but dramatically boosts the dessert’s indulgence factor.

    • Play with flavors: Vanilla extract, almond essence, or even a pinch of cinnamon or nutmeg can add an interesting twist to the mousse. A little goes a long way, so start with a drop or pinch and adjust to taste.

    • Iced coffee version: Perfect for warm weather, prepare the mousse with iced coffee or coffee chilled with ice cubes. Keep in mind the mousse will be less firm and more fluid but equally refreshing.

    Why This Coffee Mousse Is Perfect When Time Is Tight

    Unlike traditional mousse recipes that require whipping egg whites or heavy cream and chilling for hours, this quick coffee mousse skips all the hassle. It relies on the creamy mascarpone (or Greek yogurt) and instant coffee powder to create a rich texture and bold flavor with minimal effort.

    This recipe is excellent for busy mornings, spontaneous coffee breaks, or when unexpected guests drop by and you want to serve a stylish, homemade dessert without breaking a sweat. It’s also a fantastic way to use up leftover coffee or quickly satisfy your sweet tooth.

    Final Thoughts

    Whether you’re a hardcore coffee lover looking for a new way to enjoy your favorite drink or just someone who appreciates simple yet delicious desserts, this 2-minute coffee mousse recipe is a winner. It combines the deep, comforting flavors of coffee with the creamy indulgence of mascarpone, creating a luscious treat you can make anytime.

    Give it a try today and turn your coffee break into a mini celebration!

Top Ad 728x90