Top Ad 728x90

Wednesday, July 3, 2024

Chocolate Layered Dessert with Creamy Filling and Chocolate Shavings

by


Ingredients:

For the Cake Layers:

  • 1 box of chocolate cake mix (or your favorite homemade chocolate cake recipe)
  • Ingredients as per cake mix instructions (eggs, oil, water)

For the Creamy Filling:

  • 2 cups heavy cream
  • 1 cup mascarpone cheese (or cream cheese)
  • 1 cup powdered sugar
  • 1 tsp vanilla extract

For the Topping:

  • Chocolate shavings (dark or milk chocolate, as per preference)

Instructions:

1. Prepare the Cake Layers:

  • Preheat your oven according to the instructions on the cake mix box.
  • Prepare the chocolate cake batter as per the instructions on the box.
  • Divide the batter evenly into two round cake pans and bake as directed.
  • Once baked, allow the cakes to cool completely. Once cooled, slice each cake horizontally to create four thin layers of cake.

2. Prepare the Creamy Filling:

  • In a large mixing bowl, whip the heavy cream until soft peaks form.
  • In another bowl, combine the mascarpone cheese, powdered sugar, and vanilla extract. Beat until smooth.
  • Gently fold the whipped cream into the mascarpone mixture until fully incorporated and smooth.

3. Assemble the Dessert:

  • In a large glass dish (like the one in the image), place one layer of the chocolate cake.
  • Spread a generous layer of the creamy filling over the cake layer.
  • Repeat the layering process with the remaining cake layers and creamy filling, finishing with a layer of the creamy filling on top.
  • Cover the top layer generously with chocolate shavings.

4. Chill and Serve:

  • Cover the dish with plastic wrap and refrigerate for at least 2 hours, or overnight, to allow the flavors to meld and the dessert to set.
  • Serve chilled, scooping out portions to reveal the beautiful layers.

Enjoy your delicious, creamy, chocolate layered dessert!
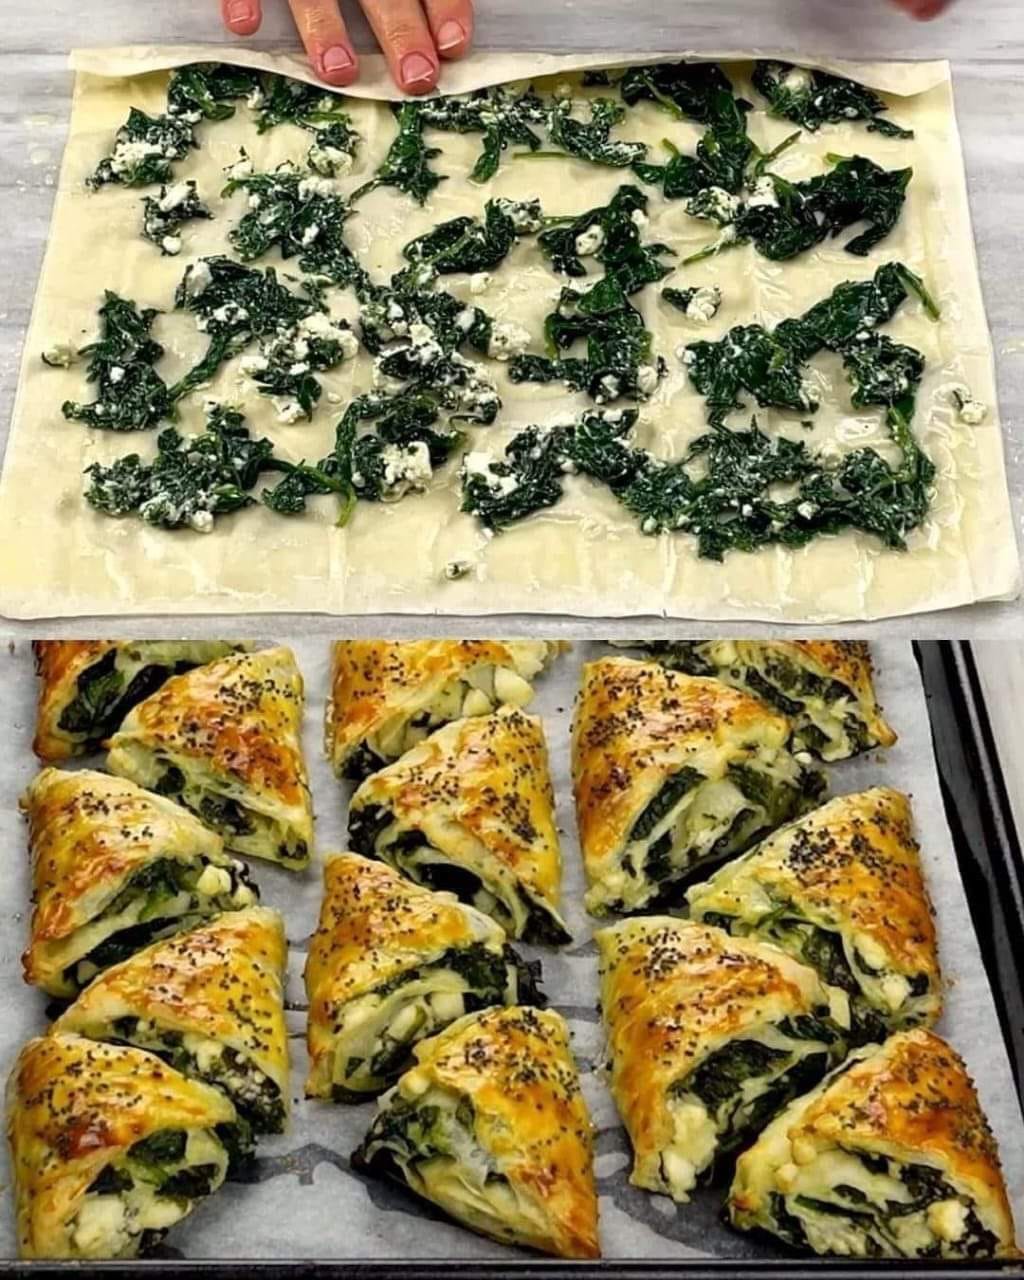
Spanakopita

by


Ingredients

  • 1 egg
  • 125 ml (1/2 cup) milk
  • 125 ml (1/2 cup) vegetable oil
  • 2 tablespoons water
  • 1 teaspoon salt
  • Spinach
  • Feta cheese
  • Salt and pepper, to taste
  • 3 sheets of filo dough
  • Poppy seeds
  • 1 egg yolk

Preparation

  1. Mix the egg, milk, vegetable oil, water, and salt in a bowl.
  2. Layer one sheet of filo dough and pour a portion of the mixture over it, spreading it evenly. Repeat with two more sheets of filo dough, creating a total of 3 layers.
  3. Mix the cooked spinach and crumbled feta cheese together. Spread this mixture evenly over the layered filo dough.
  4. Roll the filo dough tightly from one end to the other to form a long strip.
  5. Cut the rolled dough into triangles and place them on a baking sheet lined with parchment paper.
  6. Brush each triangle with egg yolk.
  7. Sprinkle poppy seeds over the triangles.
  8. Bake at 180°C (356°F) for 15 minutes, or until golden brown.

Enjoy your delicious spinach and feta filo triangles!

Crumble-Topped Cheesecake

by


Ingredients

For the Crust:

  • 1 1/2 cups graham cracker crumbs
  • 1/4 cup granulated sugar
  • 1/2 cup unsalted butter, melted

For the Cheesecake Filling:

  • 3 packages (8 oz each) cream cheese, softened
  • 1 cup granulated sugar
  • 1 cup sour cream
  • 1 teaspoon vanilla extract
  • 4 large eggs

For the Crumble Topping:

  • 1 cup all-purpose flour
  • 1/2 cup granulated sugar
  • 1/2 cup unsalted butter, cold and cubed
  • 1/2 teaspoon ground cinnamon (optional)

Preparation

Prepare the Crust:

  1. Preheat the oven to 350°F (175°C).
  2. In a medium bowl, mix the graham cracker crumbs, sugar, and melted butter until well combined.
  3. Press the mixture into the bottom of a 9-inch springform pan.
  4. Bake the crust for 10 minutes, then remove from the oven and let it cool.

Prepare the Cheesecake Filling:

  1. In a large bowl, beat the cream cheese and sugar together until smooth and creamy.
  2. Add the sour cream and vanilla extract, and mix until well combined.
  3. Add the eggs one at a time, beating well after each addition.
  4. Pour the cheesecake filling over the cooled crust in the springform pan.

Prepare the Crumble Topping:

  1. In a medium bowl, combine the flour, sugar, and cinnamon (if using).
  2. Add the cold, cubed butter and use a pastry cutter or your fingers to work the butter into the dry ingredients until the mixture resembles coarse crumbs.

Bake the Cheesecake:

  1. Bake in the preheated oven for about 1 hour, or until the center is almost set but still slightly jiggly.
  2. Turn off the oven and let the cheesecake cool in the oven with the door slightly open for about 1 hour.
  3. Remove from the oven and refrigerate for at least 4 hours or overnight.

Serve:

Carefully remove the sides of the springform pan before serving. Slice and enjoy this unique and delightful Crumble-Topped Cheesecake!

Enjoy your unique crumble-topped cheesecake!

Effortless Lemon Ice Cream

by


Ice Cream Lovers, Rejoice!

Imagine creating a delicious, sugar-free lemon ice cream at home using just three ingredients in under five minutes. This simple recipe not only satisfies your sweet tooth but does so in a healthier way, without any added sugar. Here’s how to make this refreshing treat that’s so easy and tasty, you may never want to buy store-bought ice cream again!

1. Benefits of Homemade Lemon Ice Cream

  • Healthier: By making your own ice cream, you control the ingredients, ensuring there are no unwanted additives or sugars.
  • Refreshing: Lemon adds a natural zest that is both invigorating and delightful, perfect for cooling down on a warm day.
  • Simple Ingredients: With only three ingredients, this recipe is uncomplicated and quick, ideal for spontaneous dessert cravings.

2. Ingredients Needed

To whip up your own batch of lemon ice cream, you’ll need:

  • 1 cup of heavy cream
  • 2 tablespoons of fresh lemon juice
  • 3 tablespoons of honey (or to taste, depending on your preference for sweetness)

3. How to Make Lemon Ice Cream

This recipe is not only straightforward but also quick, making it a perfect last-minute dessert option.

Instructions:

  1. Mix Ingredients: In a medium-sized mixing bowl, combine the heavy cream, fresh lemon juice, and honey. Mix thoroughly until the honey is completely dissolved.
  2. Whisk or Blend: Using a hand mixer or blender, whip the mixture until it becomes thick and creamy. This usually takes about 3 to 4 minutes.
  3. Freeze: Pour the mixture into a freezer-safe container. If you prefer a soft-serve consistency, you can enjoy it immediately. For those who like their ice cream firmer, freeze it for about an hour, then stir it, and freeze again until it reaches the desired consistency.

4. Serving Suggestions

Scoop your lemon ice cream into bowls or cones. This ice cream pairs beautifully with fresh berries or a sprig of mint for an extra touch of elegance and freshness. It’s a wonderful dessert to follow a meal or as a cool treat on a sunny afternoon.

5. Storage Tips

Store any leftover ice cream in an airtight container in the freezer. Before serving again, let it sit out for a few minutes to soften slightly for easier scooping.

Conclusion

This three-ingredient, sugar-free lemon ice cream is a testament to the idea that simplicity often leads to the best results. Quick, easy, and delightfully refreshing, it’s a perfect treat for anyone looking to indulge their sweet tooth without overdoing it on sugar. Give this recipe a try, and it might just become your new favorite way to beat the heat and keep your dessert game light and zesty!

Chicken and Mushroom Stew

by


Ingredients

  • 4 boneless, skinless chicken breasts
  • 2 cups mushrooms, sliced
  • 1 large onion, diced
  • 2 cloves garlic, minced
  • 2 cups chicken broth
  • 1 cup dry white wine (optional)
  • 1 cup heavy cream
  • 2 tablespoons olive oil
  • 2 tablespoons butter
  • 2 tablespoons flour
  • 1 tablespoon Worcestershire sauce
  • Salt and pepper, to taste
  • Fresh parsley, chopped (for garnish)

Preparation

1. Prepare the Chicken:

  • Season the chicken breasts with salt and pepper.
  • Heat the olive oil in a large skillet over medium-high heat.
  • Brown the chicken breasts on both sides until golden. Remove from the skillet and set aside.

2. Cook the Vegetables:

  • In the same skillet, add the butter.
  • SautĂ© the onions and garlic until they become translucent.
  • Add the sliced mushrooms and cook until they release their moisture and start to brown.

3. Make the Sauce:

  • Sprinkle the flour over the mushrooms and stir to coat.
  • Slowly pour in the chicken broth and white wine (if using), stirring constantly to avoid lumps.
  • Add the Worcestershire sauce and bring the mixture to a simmer.

4. Combine and Simmer:

  • Return the chicken breasts to the skillet.
  • Pour in the heavy cream and stir to combine.
  • Reduce the heat to low and let the stew simmer for about 20-25 minutes, or until the chicken is fully cooked and the sauce has thickened.

5. Serve:

  • Garnish with freshly chopped parsley.
  • Serve the chicken and mushroom stew hot, over rice, mashed potatoes, or pasta.

Enjoy your meal! If you’d like any modifications or have any dietary preferences, feel free to let me know!

Made dinner together tonight, and we both couldn’t stop eating it! My hubby took more than half of it

by


Ingredients:

  • 1.5 pounds ground beef
  • 1 (10.5-ounce) can condensed cream of mushroom soup
  • 1 (10.5-ounce) can condensed cream of cheddar cheese soup
  • 3 cups frozen potato cubes
  • 1 cup shredded cheddar cheese
  • Salt and pepper, to taste

Preparation:

  1. Preheat your oven to 350°F (175°C). Lightly grease a 9×13 casserole dish.
  2. Brown the ground beef in a skillet until thoroughly cooked, then drain and transfer to a large mixing bowl.
  3. Stir in both condensed soups into the cooked ground beef.
  4. Add frozen potato cubes, half of the shredded cheddar cheese, salt, and pepper to the mixture. Mix until well combined.
  5. Pour the mixture into the prepared casserole dish. Sprinkle the remaining shredded cheddar cheese evenly over the top.
  6. Cover the dish securely with foil and bake in the preheated oven for 30 minutes.
  7. Remove the foil and bake for an additional 30 minutes, or until the top is golden and bubbly.

Relive the affection and tradition enveloped in Grandma’s Ground Beef Casserole, a dish that speaks volumes about family, love, and treasured culinary legacies. Bon appĂ©tit!

Enjoy!

Cranberry Orange Bread with Simple Glaze

by


Ingredients

  • 1 1/2 cups plus 1 tablespoon all-purpose flour, divided
  • 2 teaspoons baking powder
  • 1/2 teaspoon kosher salt
  • 1 cup regular whole-milk yogurt
  • 1 cup sugar
  • 3 large eggs
  • 2 tablespoons grated orange zest
  • 1/2 teaspoon pure vanilla essence
  • 1/2 cup vegetable oil
  • 1/2 cup fresh or frozen cranberries, thawed and washed

For the Orange Syrup:

  • 1/3 cup freshly squeezed orange juice
  • 1 3/4 cups sugar

For the Orange Glaze:

  • 2 to 3 tablespoons fresh orange juice, strained
  • 1 cup confectioners' sugar

Instructions

Preparation

  1. Preheat the oven to 350°F (175°C). Grease and flour a 9 x 5-inch loaf pan, tapping out any excess flour.
  2. In a medium bowl, sift together 1 1/2 cups of flour, baking powder, and salt. Set aside.

Making the Bread

  1. In a large bowl, whisk together yogurt, sugar, eggs, orange zest, vanilla essence, and vegetable oil.
  2. Gently whisk the dry ingredients into the wet ingredients until just combined.
  3. Toss cranberries with the remaining 1 tablespoon of flour in a separate bowl, then fold them into the batter.
  4. Spoon the batter into the prepared loaf pan and smooth the top.
  5. Bake for 50 to 55 minutes, or until a toothpick inserted into the center of the loaf comes out with moist crumbs attached.
  6. Allow the bread to cool in the pan for 10 minutes, then transfer it to a wire rack placed over a baking sheet.

Preparing the Orange Syrup

  1. While the loaf is cooling, make the orange syrup. In a small saucepan over medium heat, stir together the orange juice and sugar until the sugar has completely dissolved.
  2. Continue to cook for an additional 3 minutes after the sugar has dissolved. Remove from heat and set aside.

Applying the Orange Syrup

  1. Poke holes in the top and sides of the warm loaf using a toothpick.
  2. Brush the warm orange syrup over the top and sides of the bread, allowing it to soak in. Repeat if necessary.
  3. Let the bread cool completely.

Making the Orange Glaze

  1. In a small bowl, whisk together the strained orange juice and confectioners' sugar until smooth and thick yet pourable. Add more orange juice if needed to achieve the desired consistency.

Applying the Orange Glaze

  1. Pour the orange glaze over the top of the cooled bread, allowing it to drip down the sides.
  2. Let the glaze set for about 15 minutes before slicing and serving.

Enjoy your delicious Cranberry Orange Bread!

Top Ad 728x90